FAQ Overview
Android
Identity Cloaker for Android 2.x till 4.x (no root required)
OpenVPN on Android without root
FEAT VPN is an Android app that brings OpenVPN to Android versions 2.1 through 4.x. In contrast to existing apps, FEAT VPN does not require you to root your Android phone or tablet and thus void its warranty. FEAT VPN works on unmodified off-the-shelf devices.
Step 1 - Get VPN configure files to your phone:
You can get all configs within one zip here (The zip needs to be extracted to your phone) Or you can pickup individual files here
The configs need to be stored in some folder on your phone. You can use your phone file browser or your PC and data sharing/mass storage.
Step 2 - Get FeatVPN for your device
Please get Feat VPN for Android 2.x or 3.x or Feat VPN for Android 4.x . If you are not sure about it then please check your Settings->About phone-> Android version Information.
Open downloaded file and click install button.

Image 1: FeatVPN installation from downloaded .apk file
Step 3 - Run FeatVPN and add VPN servers:
1, Please run "FeatVPN" and accept License agreement.
2, Click Setup button and wait until the Setup will finish.

Testing setup
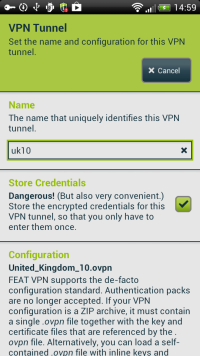
3, Click Tunnels button -> Add.
4, Put in some arbitrary name.
5, Check-in Store Credentials box to save your password.
6, Click on Load button. It will allow you to browse your phone file system and add a new VPN server from .opvn file.
Adding tunnel
7, Press back button.
8. Double click added server and put it your IDC credentials.
9. It will connect now.

Connected
Author: Petr Munzar
Last update: 2017-11-18 21:29
IDC Android application
1. Downloading and Installing application
The latest version of our IDC application is here. You can open this link in your Andorid web browser.
Please open downloaded .apk file and install the application.
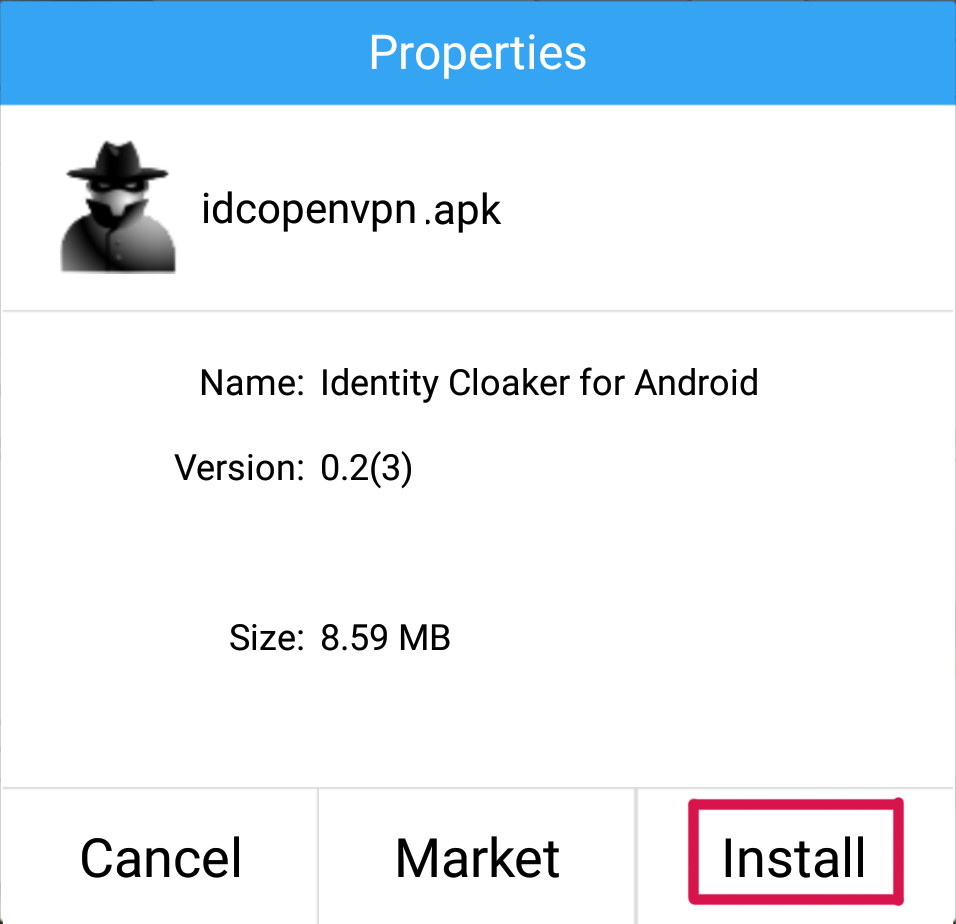
Now follows installing screen.

When app is installed then you can find it at your application list.

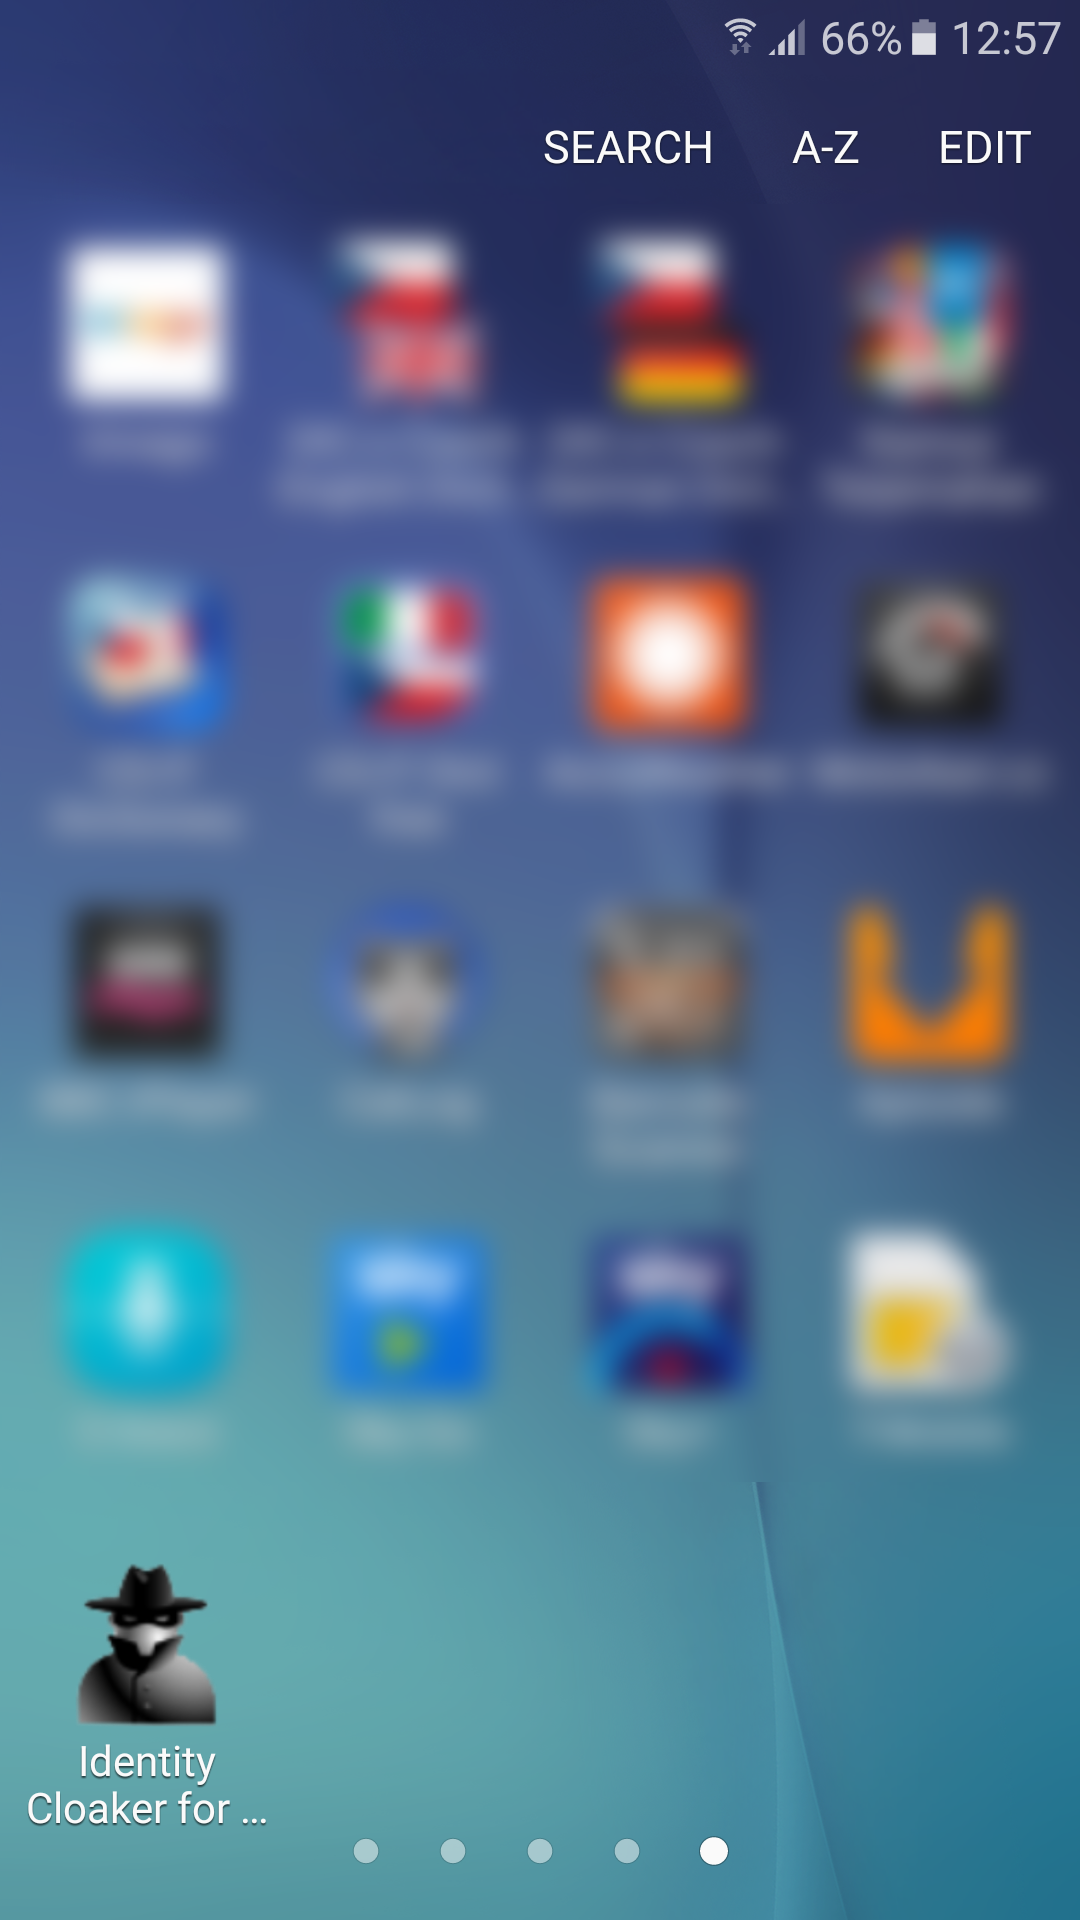
2. Using Identity Cloaker application
You should see Welcome screen after installing and running our IDC application.
Please use your own IDC credentials when asked (the same as for your member area).
Then you can proccess with top on "Secure Phone" button.

You should see VPN servers list. You can select desired server with a tap ( for example United Kingdom 12 (Standard). Alternative configurations are using port 80 (HTTP).
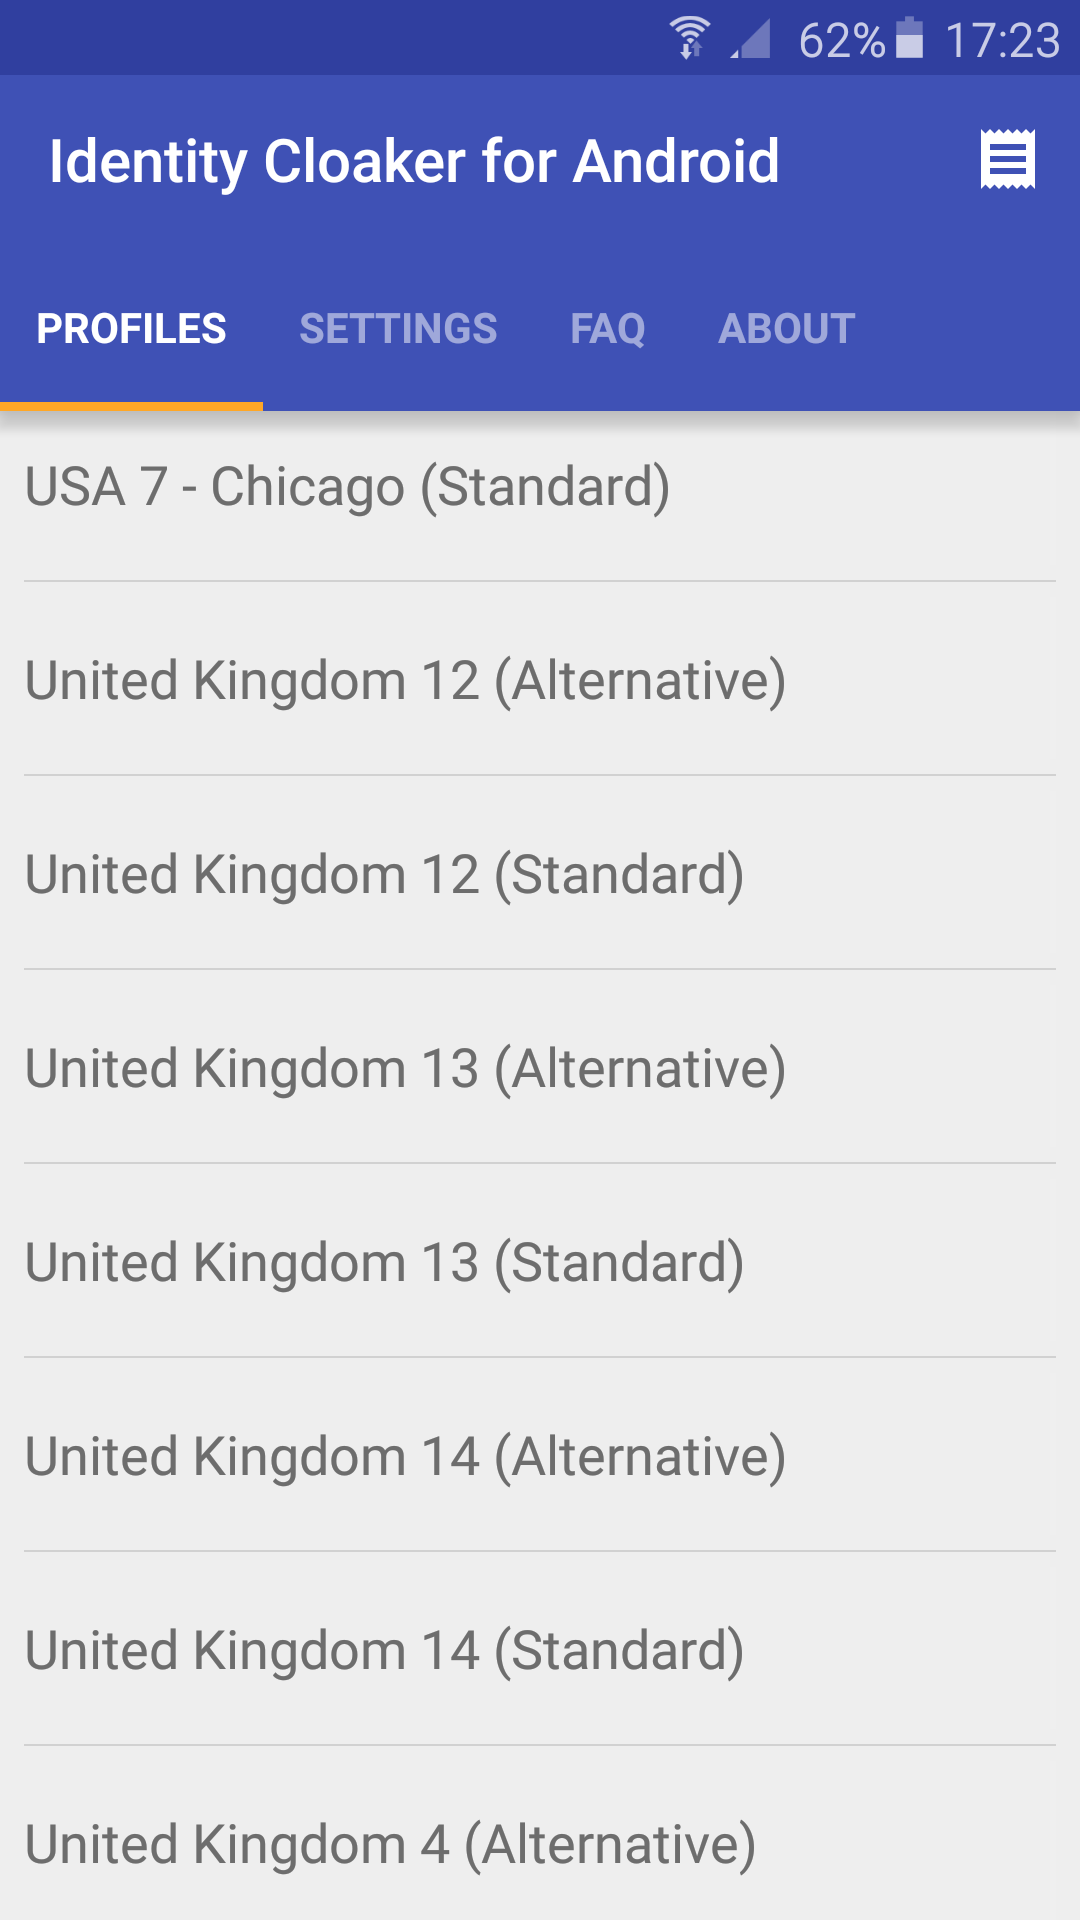
You will see connection log after tapping on the desired server.
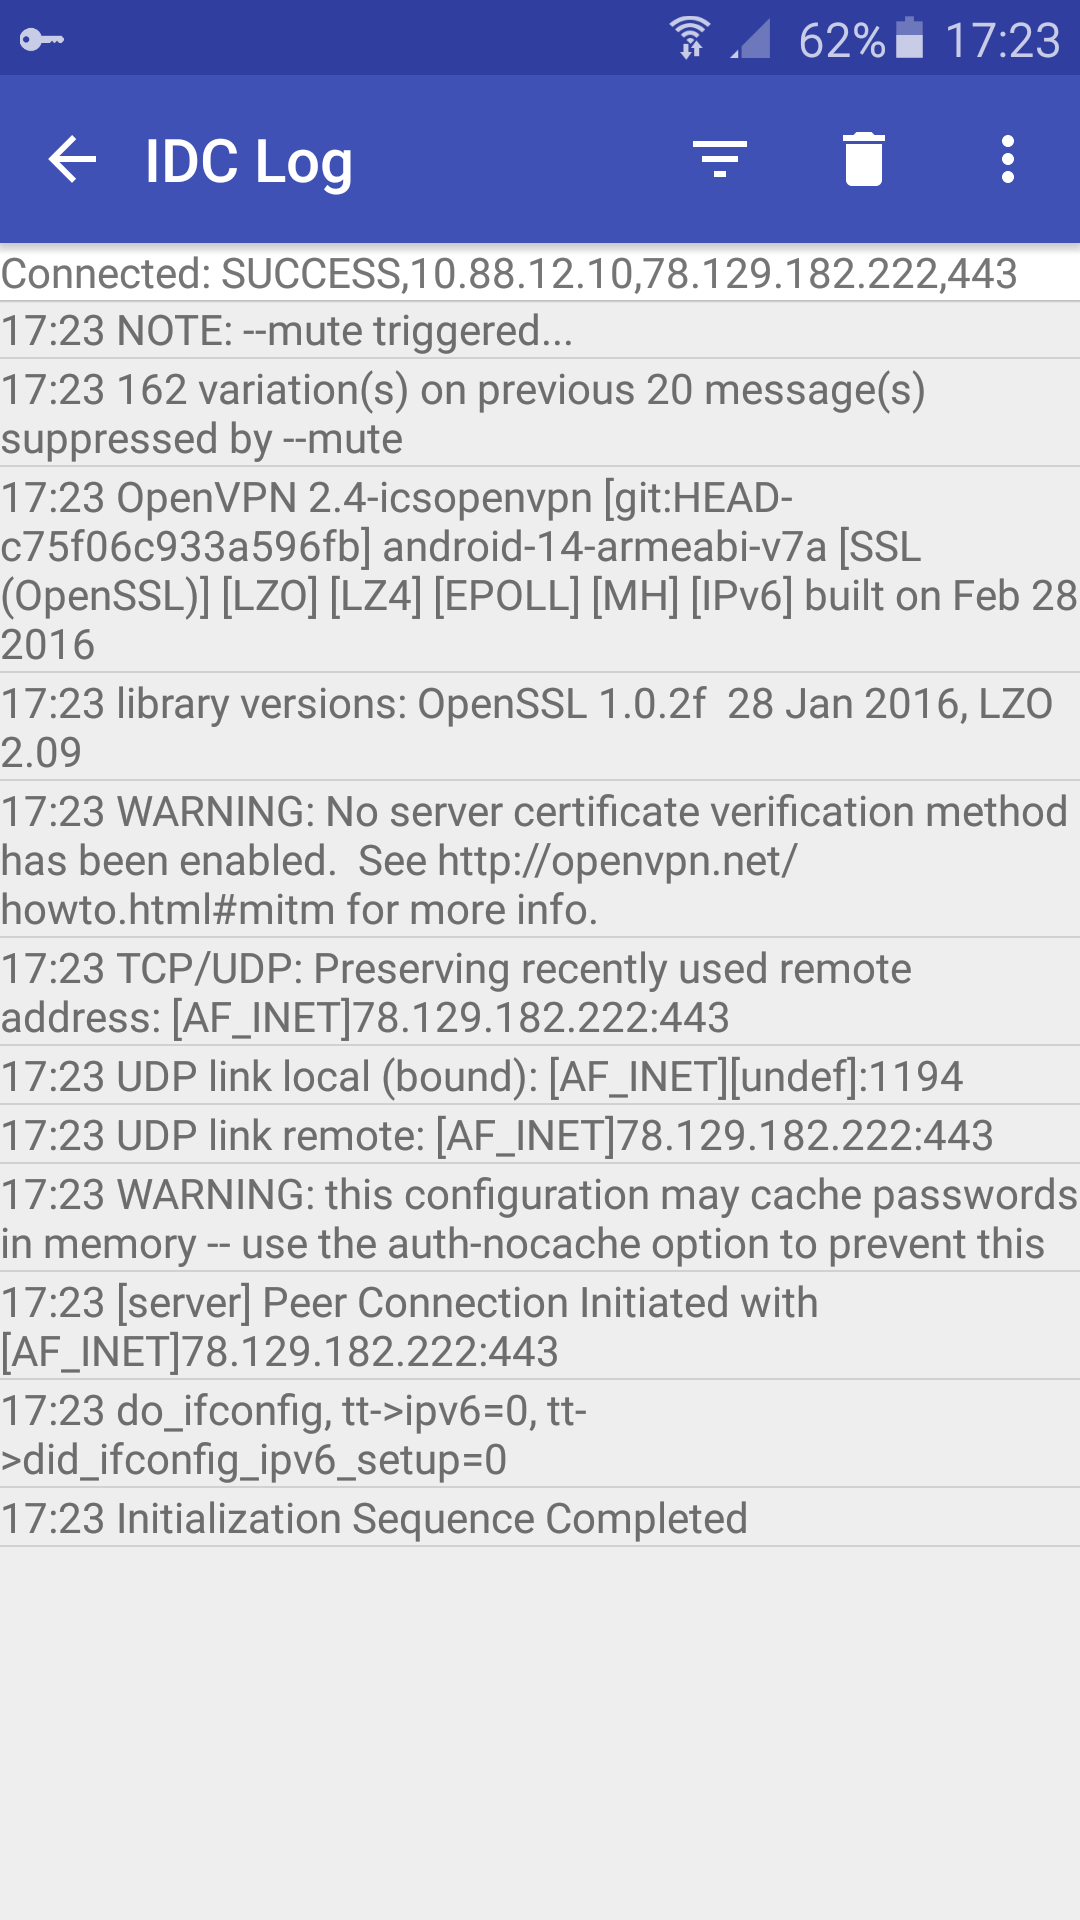
It is possible to disconnect through menu at the top bar.

Author: Petr Munzar
Last update: 2017-08-01 12:36
Android L2TP/IPSec VPN
1. Creating VPN
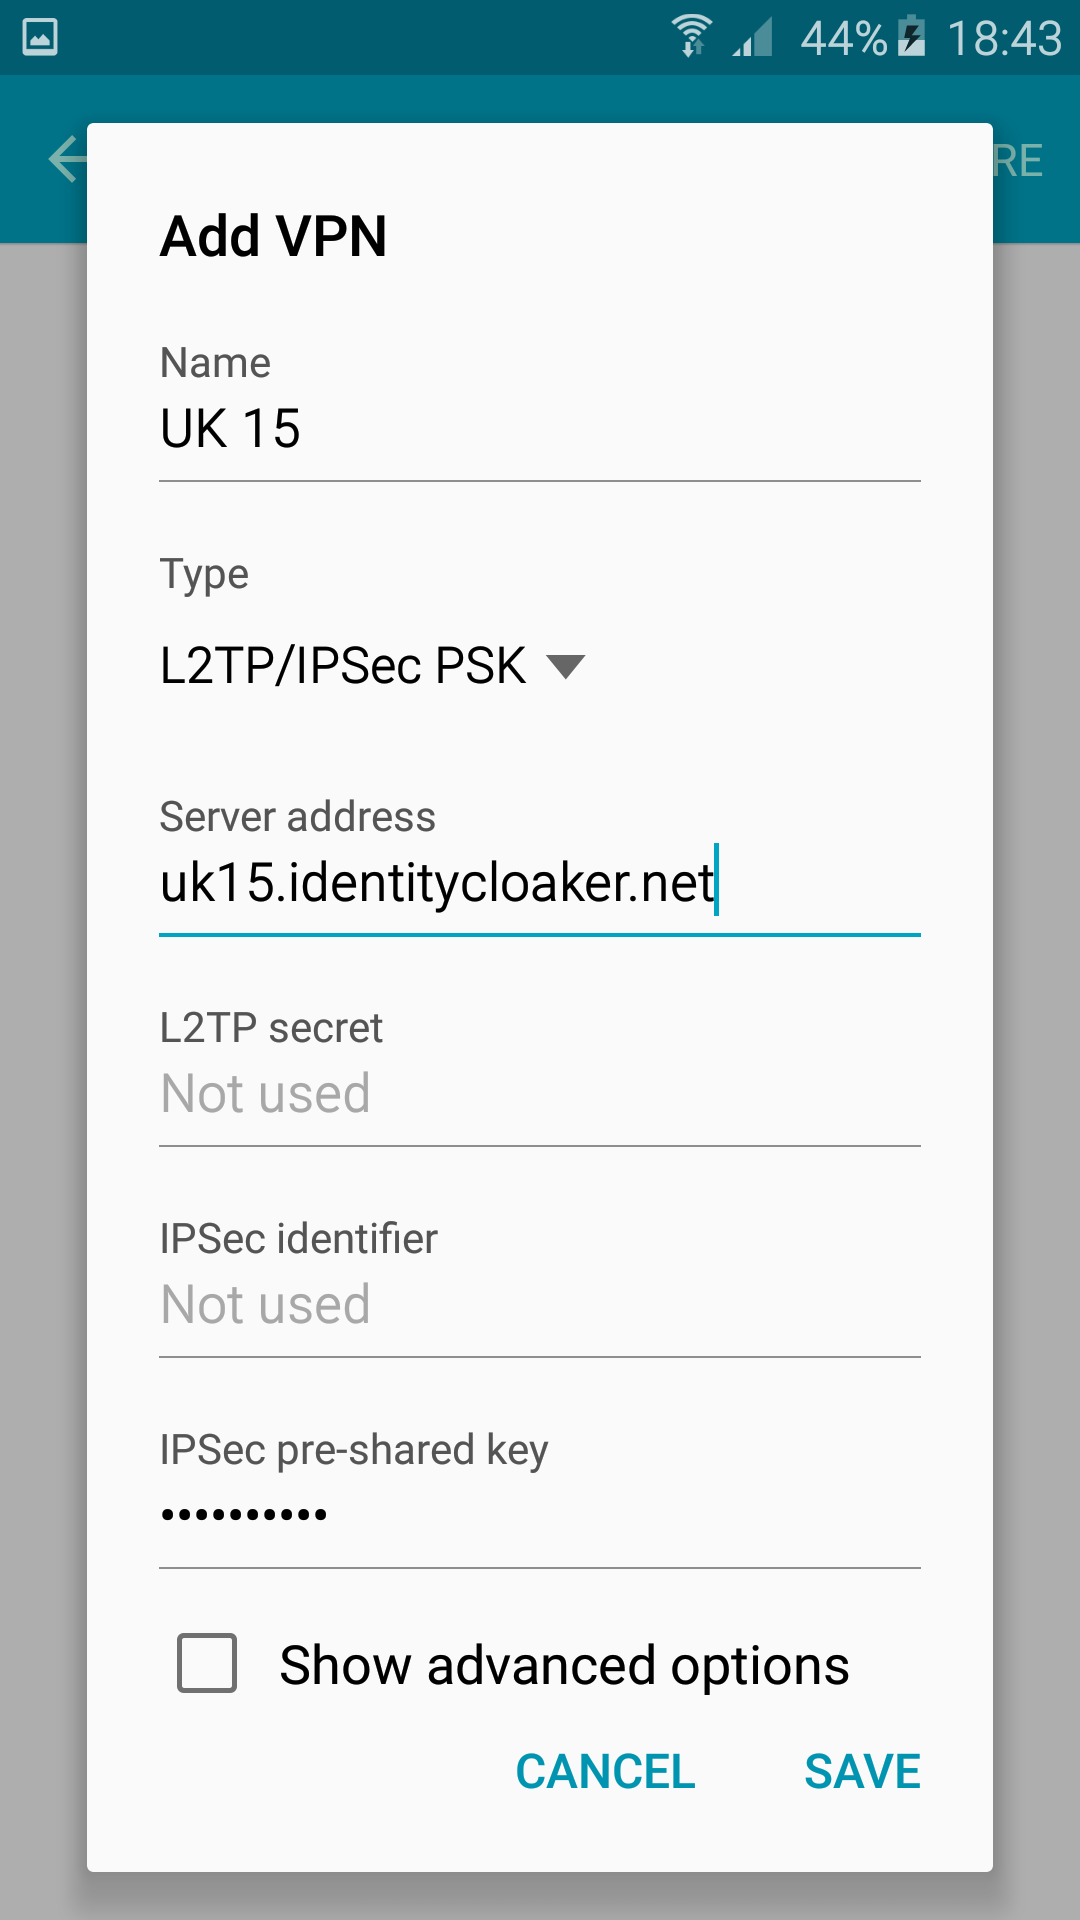
To setup native Android L2TP/IPSec VPN please go to
Settings => More connection settings => VPN => Add VPN
And use following info
Name: Arbitrary (UK15 for instance)
Type: Select "L2TP/IPsec PSK"
Server address is: uk15.identitycloaker.net – without "http://" and "/" after (for UK12 server)
L2PT secret: (not used)
IPSec Identifier: (not used)
IPSec pre-shared key: "idcvpn4876" (without quotes)
Available IPs:
AU2, CA2, CH1, CZ1, DE2, FR5, IE4, NL2, SE2, IT2, PL1, ES1, UK4, UK7, UK8, UK9, UK10, UK 11, UK 12, UK13, UK14, UK15, US3, US4, US5, US6, RU1, NO1 , PT1, AT1
To access them, replace the "uk15" part in uk15.identitycloaker.net with any of these.
Now please save the settings.
2. Connecting VPN
Now you can connect to the VPN with a tap.
You will be asked for you login details just before connection attempt.
Please verify that your credentials are working at your member area and you have a valid subscription before proceeding. Please note that username needs to be used lower case and your password is case-sensitive. You can reset it here.

3. Connected
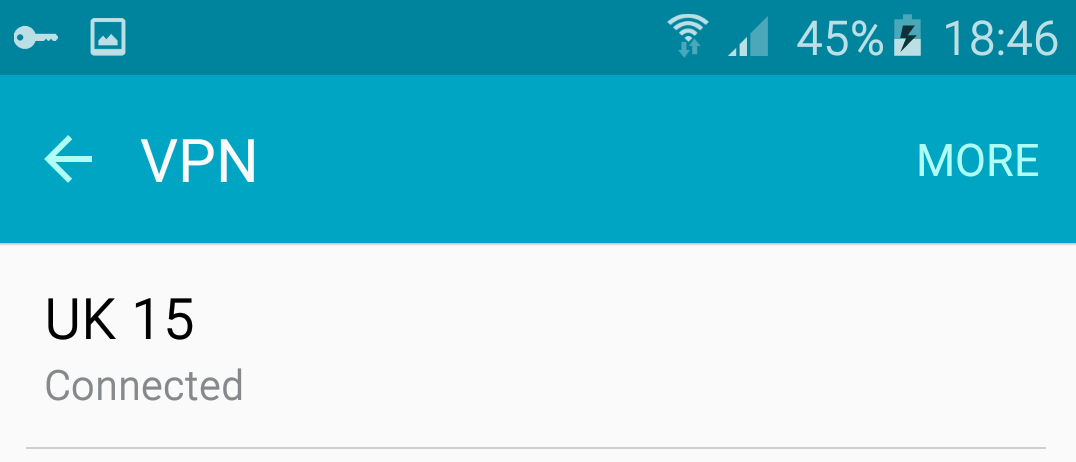
You should see "Connected" status after the connection is established.
4. Disconnect
You can get a status window after a tap on VPN and disconnect there.

Author: Petr Munzar
Last update: 2017-08-01 12:36
'Identity Cloaker for Android 4.0.3+ (no root required)
With OpenVPN for Android you can connected to Identity Cloaker servers on your Android phone. It is easy although this tutorial may looks long.
Alternatively you can use FeatVPN Which is more user friendly but it may be a little slower.
Step 1 - Get OpenVPN for Android:
Please get "OpenVPN for Android" from the Play store. It is free. You can do it from your mobile phone or PC.

Step 2 - Get VPN configure files to your phone:
You can get all configs within one zip here (The zip needs to be extracted to your phone) Or you can pickup individual files here
The configs need to be stored in some folder on your phone. You can use your phone file browser or your PC and data sharing/mass storage.
Step 3 - Run OpenVPN for Android and add VPN servers:
1,Please run "OpenVPN for Android". And click "folder" icon at right down corner. It will allow you to browser your phone file system and add a new VPN server.

2,Tap a config file (stored in step 2) fro example "United_Kingdom_10.ovpn". And press "Select" button in the left down corner.
3,The config file should be parsed (you can ignore details in the log).
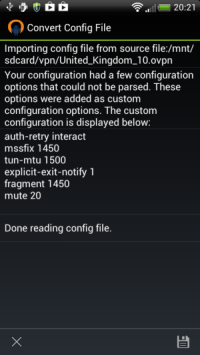
4,Pres "save" icon in the right down corner.
5,Now you should see the new server in the list. Click edit icon next to server name (right side).
6,Tap basic link.
7,Fill-up your IDC username to "Username" field, IDC password to "Password" field.

8,Get to the main server list by pressing "back" button.
9,You can connect to the new server by a single tap on it. The connection can by closed by the cross icon at window header.

Author: Petr Munzar
Last update: 2017-11-08 09:52
iOS (iPad/iPhone)
iPad/iPhone using proxy directly
We have tested an alternative approach to watching UK TV on iPad, which should work even where the VPN setup fails.
You can set a UK proxy server for your wifi connection, instead of VPN setup.
1) Tap on the Settings app. When the Settings app loads, you will be at the General Settings category.
2) Tap on the Wi-Fi settings category
You should now tap on the "icon" to access the specific settings of the wireless connection.
3) You will now be at the Wi-Fi network settings screen for the connected network.
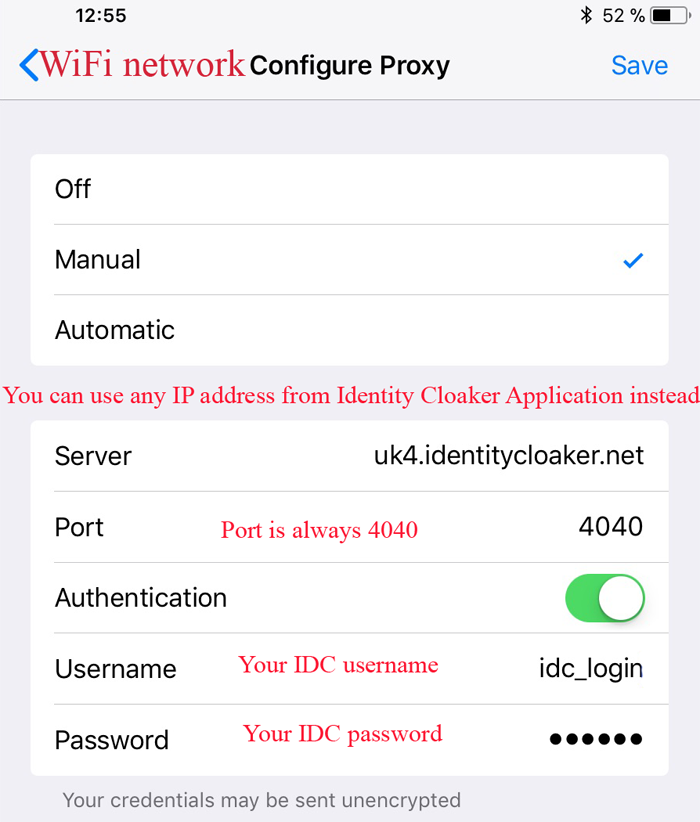
4) Tap on the Manual button and fill in the fields under HTTP Proxy
Make sure you slide Authentication to ON and input your login credentials.
Server(s) – the same as for VPN setup: uk4.identitycloaker.net, uk7.identitycloaker.net etc.
(you can choose one or test each of them consequently)
Port 4040
username: Your IDC username
password: Your IDC password
5) When you are done setting up your proxy server, tap on the Wi-Fi Networks button and then go back to your Home screen to start using the iPad with these new settings.
Author: Petr Munzar
Last update: 2017-10-23 14:52
Authentication failed during VPN connection attempt
The cause
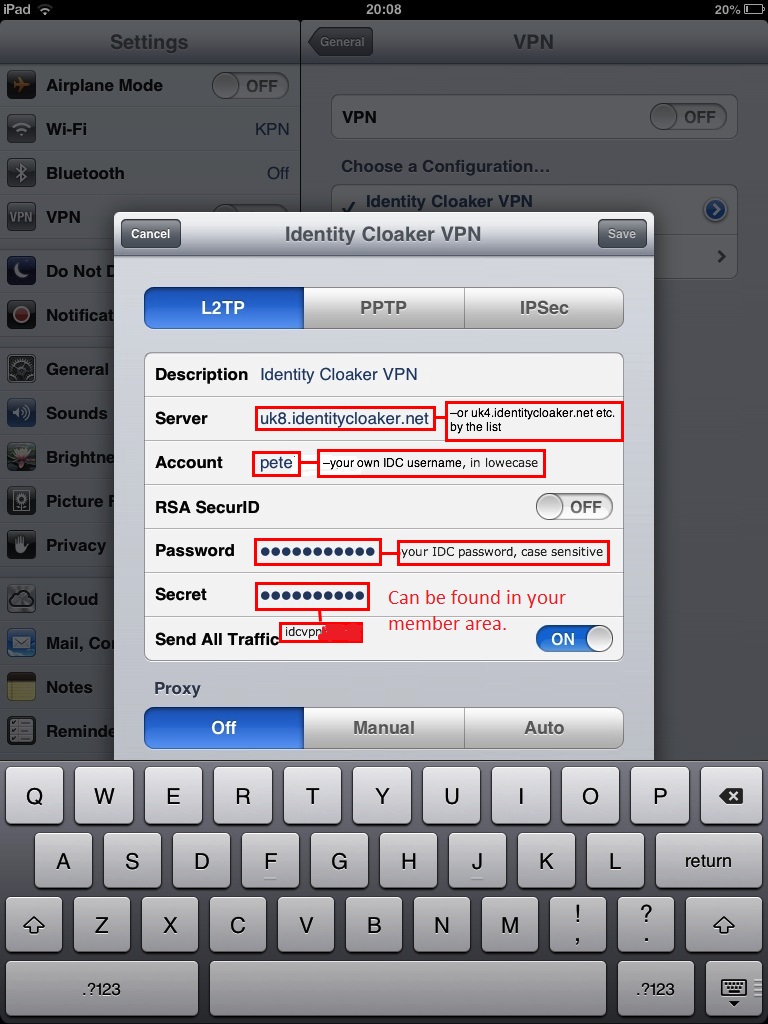
This error message is almost always caused by invalid credentials especially when other server is working. Please check your username and password again.
You can find connection details at your member area iPad/IPhone section.
Author: Petr Munzar
Last update: 2017-08-01 12:36
Using OpenVPN connect application
If L2TP/IPSec VPN is not working for you then you can use this alternative method of connection. OpenVPN connect application
1. Installation
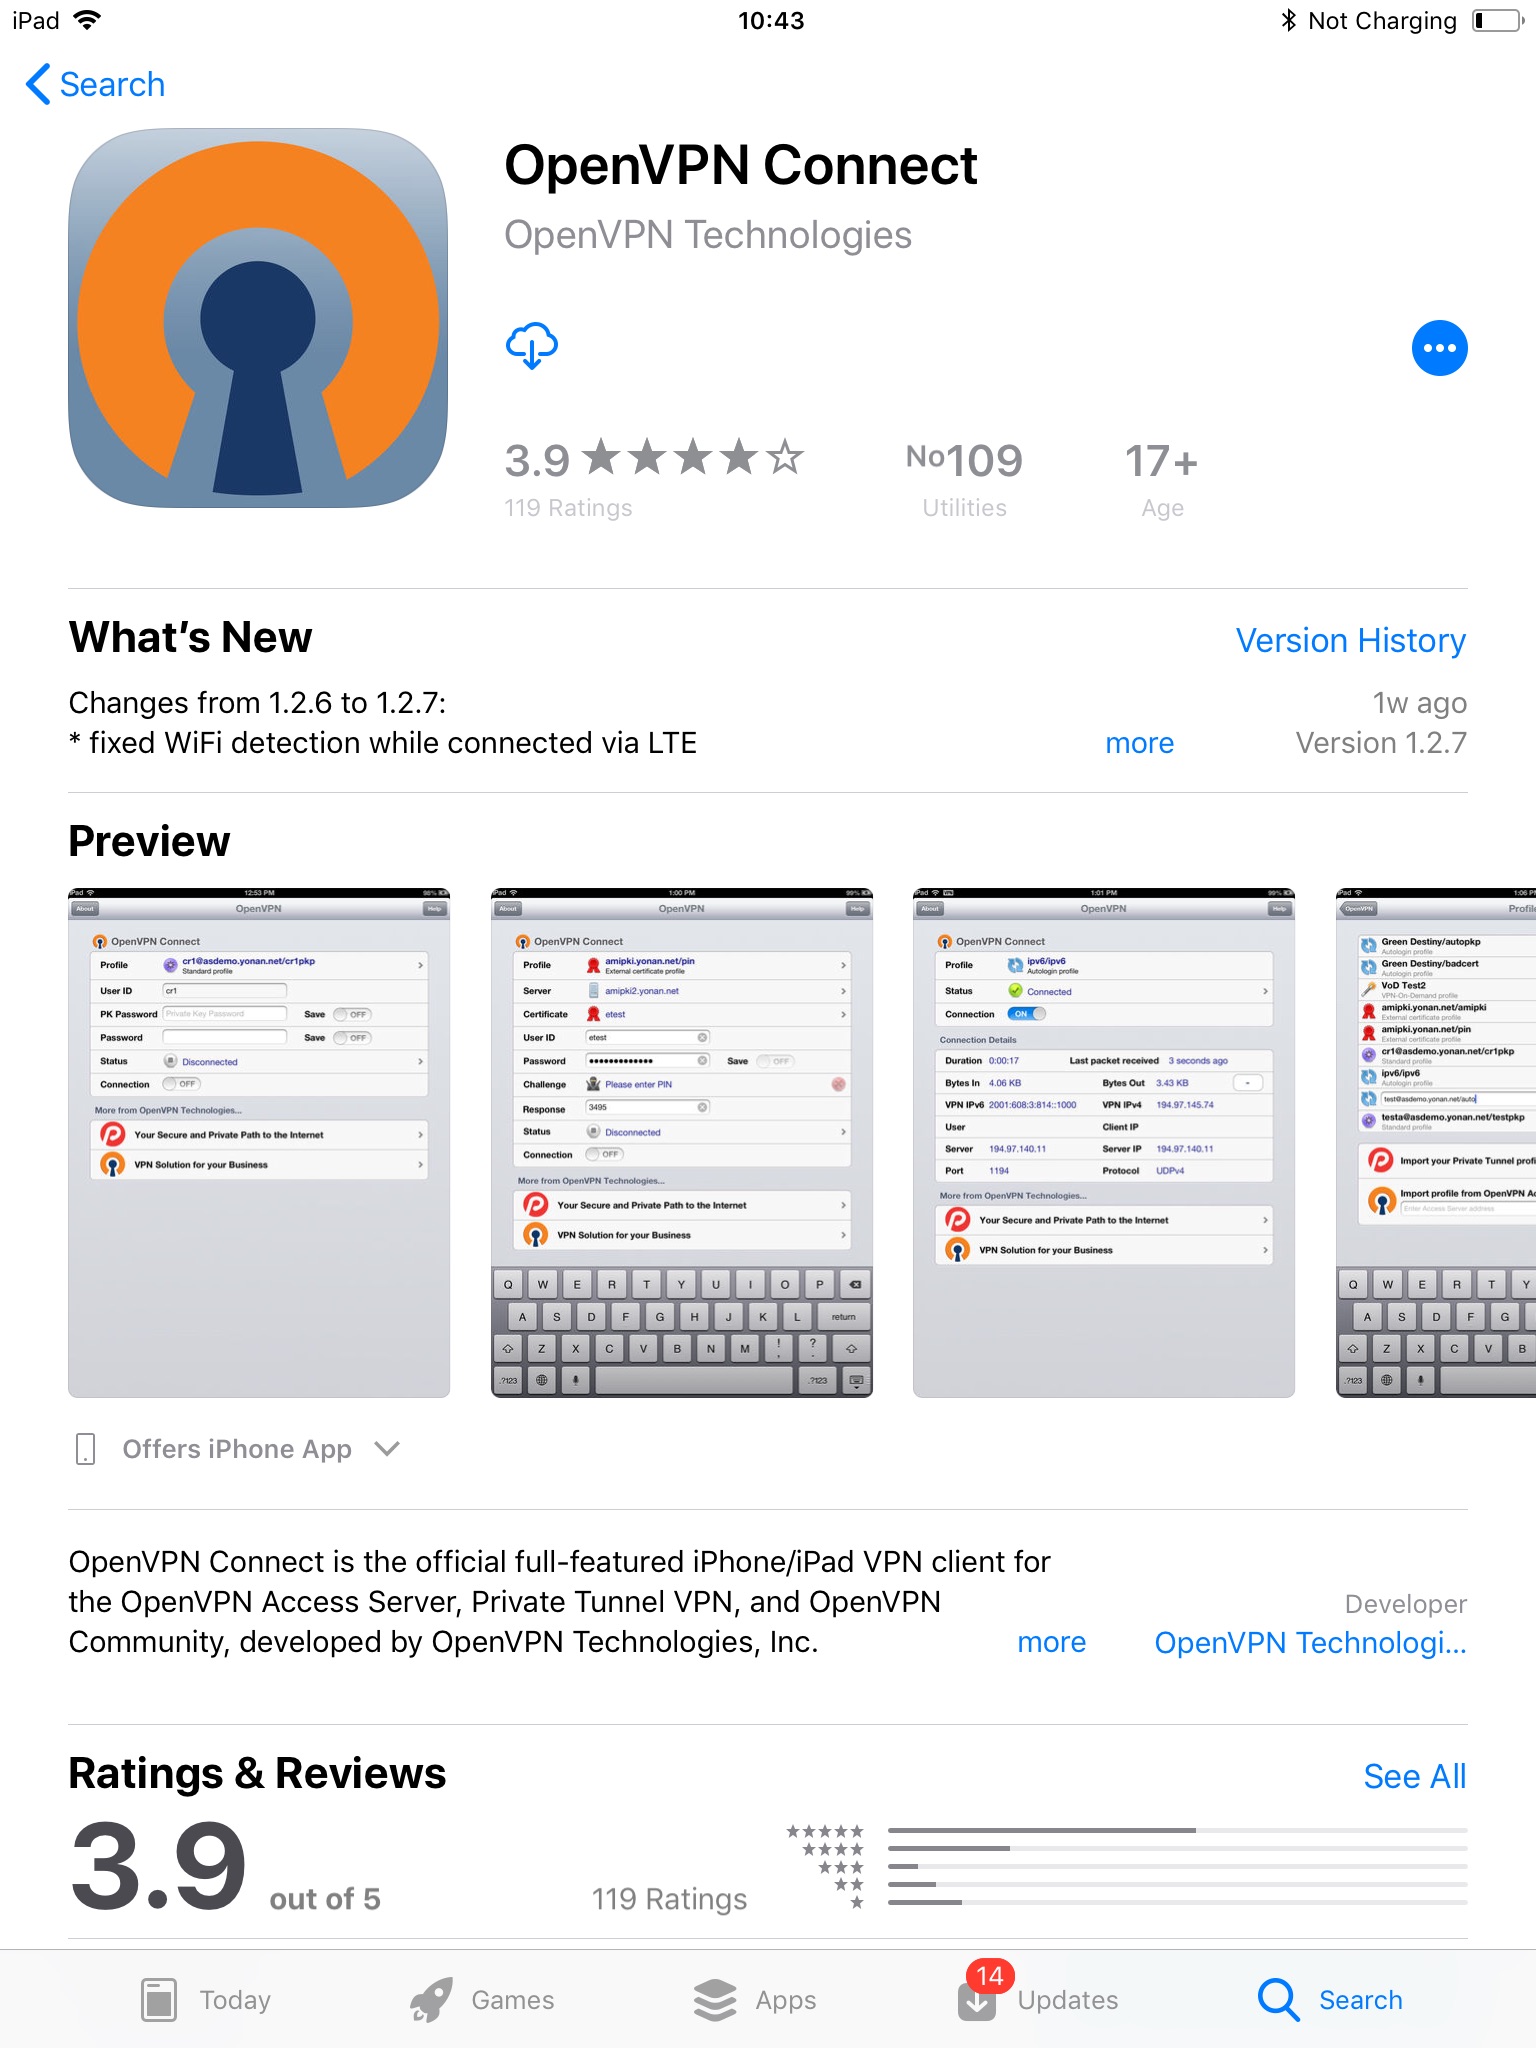
Please go to your App store sear for "OpenVPN connect" and install it.
2, Install Identity Cloaker OpenVPN configs
Please download OpenVPN cofings here . You can install it through iTunes on your Mac/PC. Please use alternative configs only.
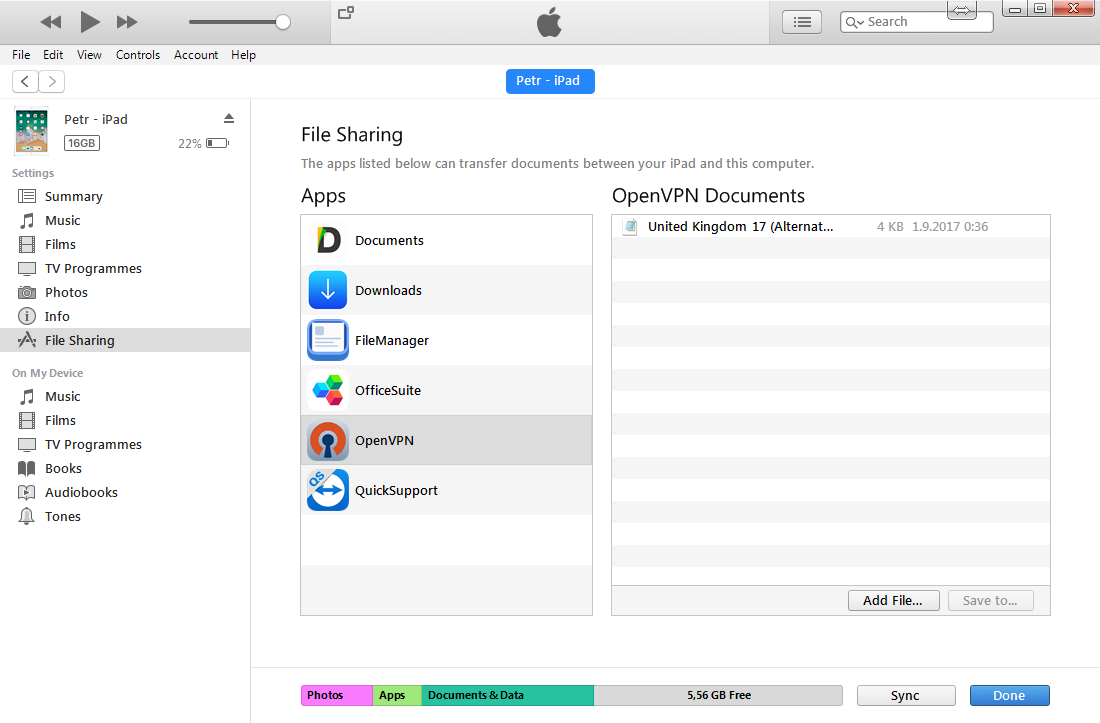
Now please run the OpenVPN connect application and you should see the new config available. Click on the + Button.

3, Connect
Now you can fill in your IDC credentials and click on connection slider.

4, Connected

Author: Petr Munzar
Last update: 2018-02-13 12:10
Browsers » Firefox
Proxy settings
Mozilla Firefox browser Proxy Settings
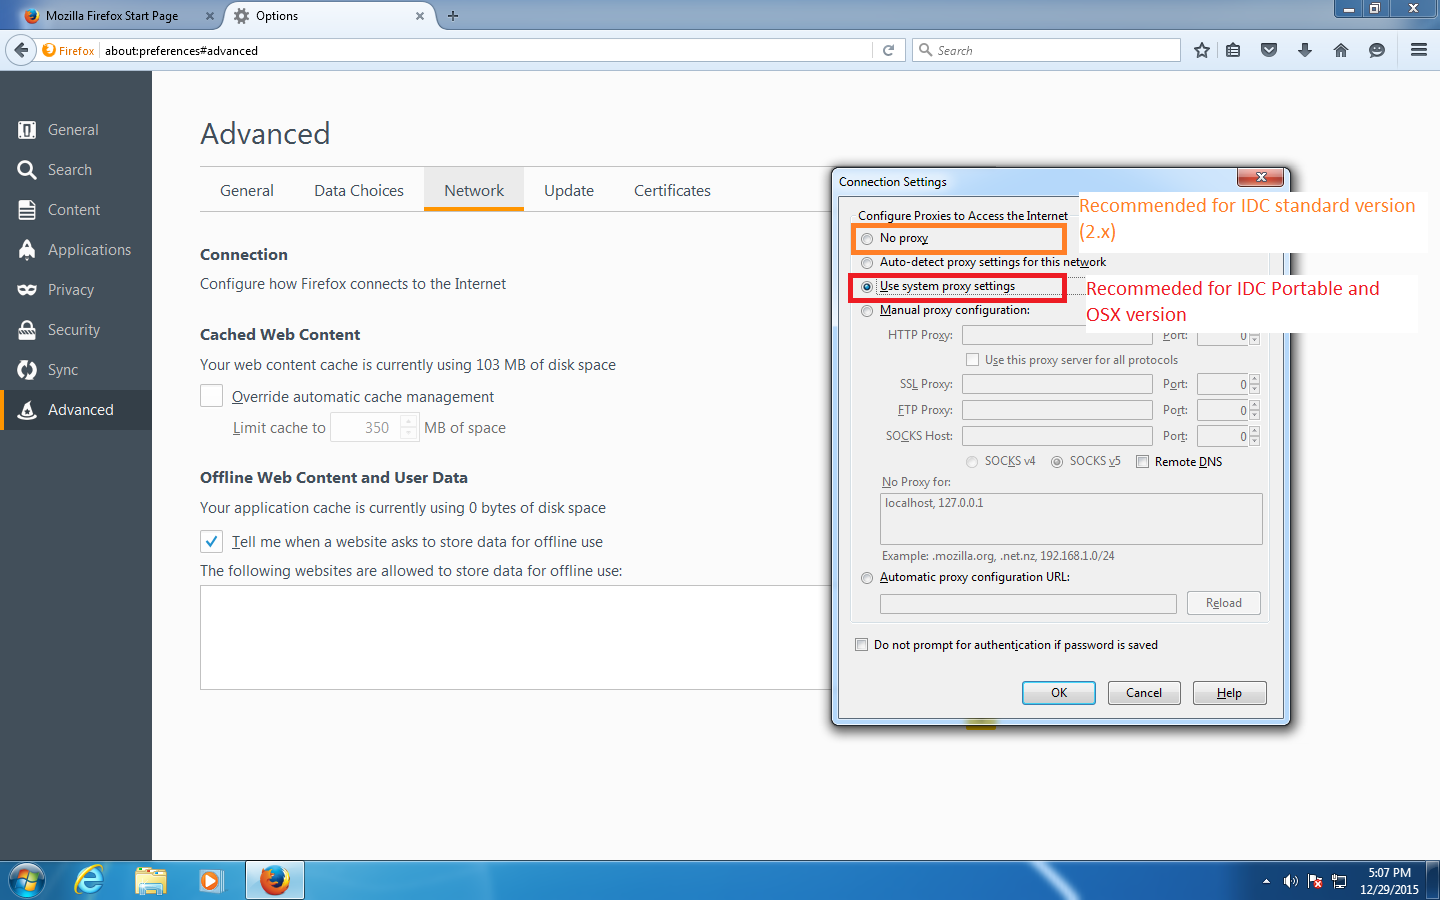
In Firefox go to Options, then Advanced and click the Network tab. Then click the Settings button next to the "Connection" part of the window and make sure "No Proxy" is selected.
Firefox will offer you this proxy options:
-
No Proxy: Firefox won't use any proxy settings and connect to the Internet network directly.This option is recommended for Identity Cloaker standard (2.x) version. As this version is integrated into your Operating system and Firefox network connections are intercepted with Identity Cloaker Core. It is not reccomeded to overide the proxy settings here. It can be also used if you to disangage Firefox from using system proxy set by Identity Cloaker portable version.
- Auto-detect proxy settings for this network: Firefox will try to set proxy automatically. This option is not used with any IDC version.
- Use system proxy settings: Firefox will use system (Internet Explorer/ Safari) proxy. This is default Firefox settings and it is recommended for Identity Cloaker Portable (if Identity Cloaker Extensions is not used) and OSX version.
- Manual proxy Configuration: This option is set by Identity Cloaker Portable Extension.
Author: Petr Munzar
Last update: 2017-08-01 12:37
Other Platforms
Synology OS
This tutorial will show you how activate Identity Cloaker OpenVPN on your Synology Router/Discstation
1. Downloading configs
You can get configs here. Please click on "Save link as" if you have troubles with download. Then extract downloaded zip to any folder on your PC.
2. Get into your Synology Admin interface
You can get into Synology admin interface via your favorite web browser.
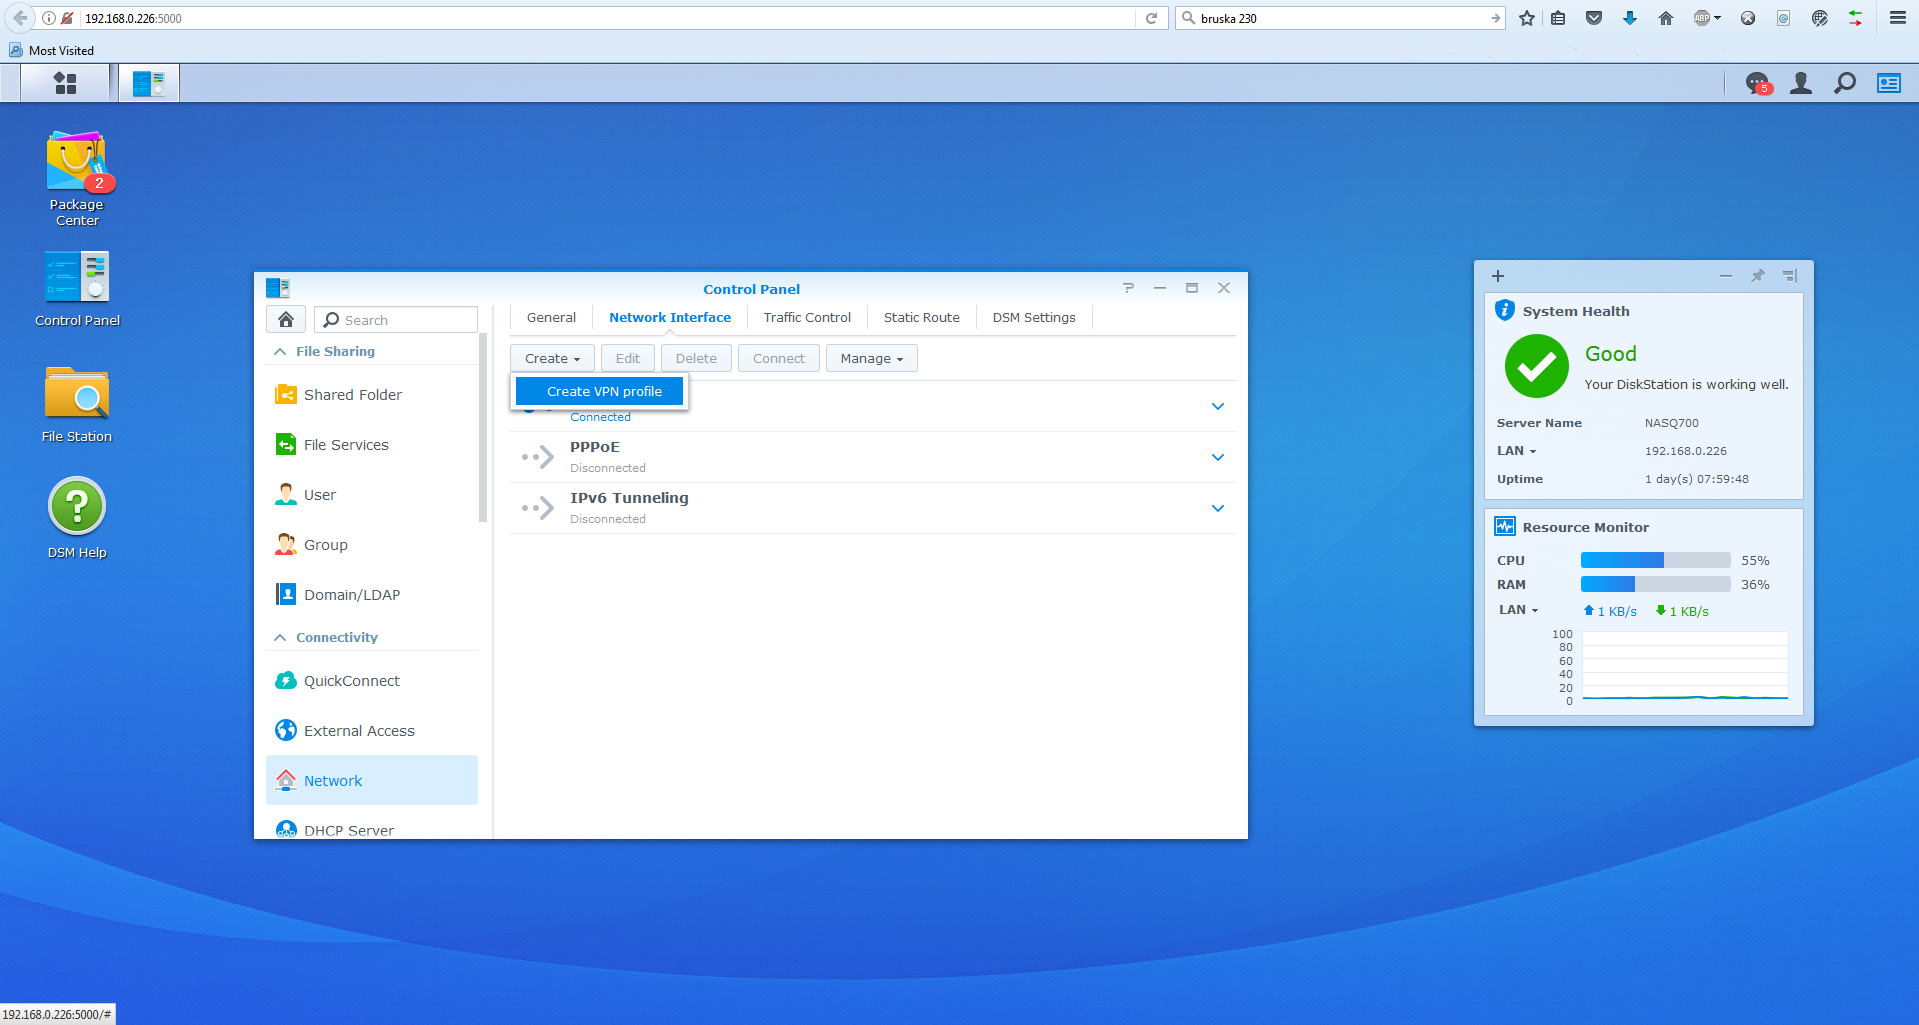
VPN can be created in Control Panel-> Network -> Create VPN profile.
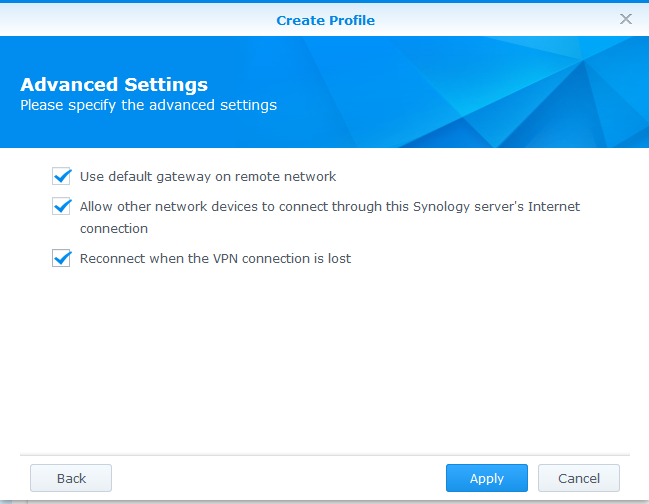
3. Configure your VPN
Select Create VPN from imported config option.
Profile name: Arbitrary VPN connection name.
Username: Your IDC username (lower-case)
Password: Your IDC password (case sensitive).
OVPN File: Config from the package.
Ca certificate: Ca.crt from the package/keys dir.
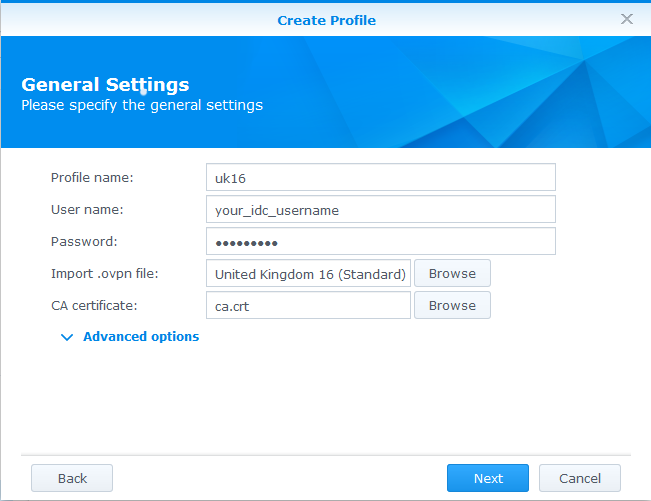
Click Next.
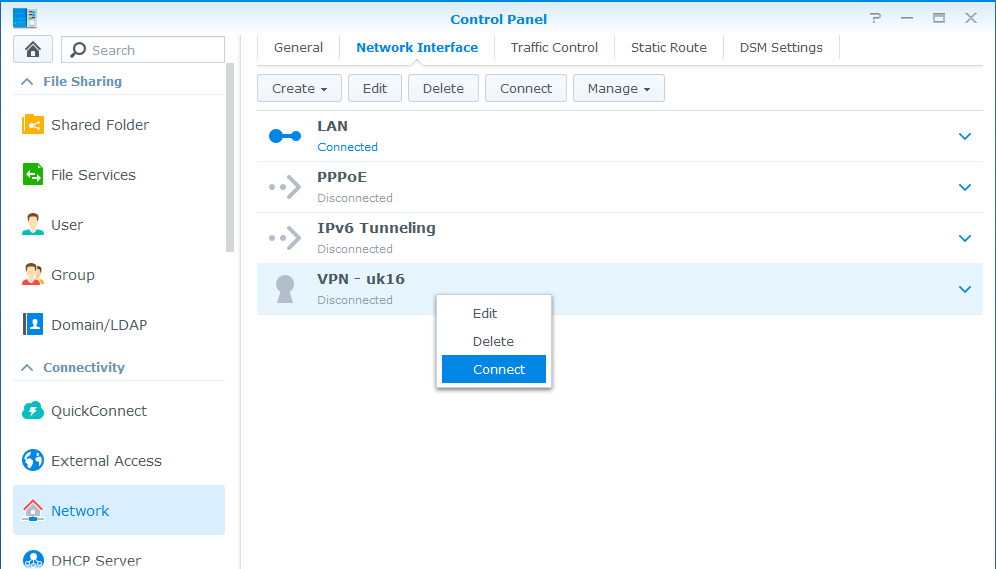
4. Activate your VPN
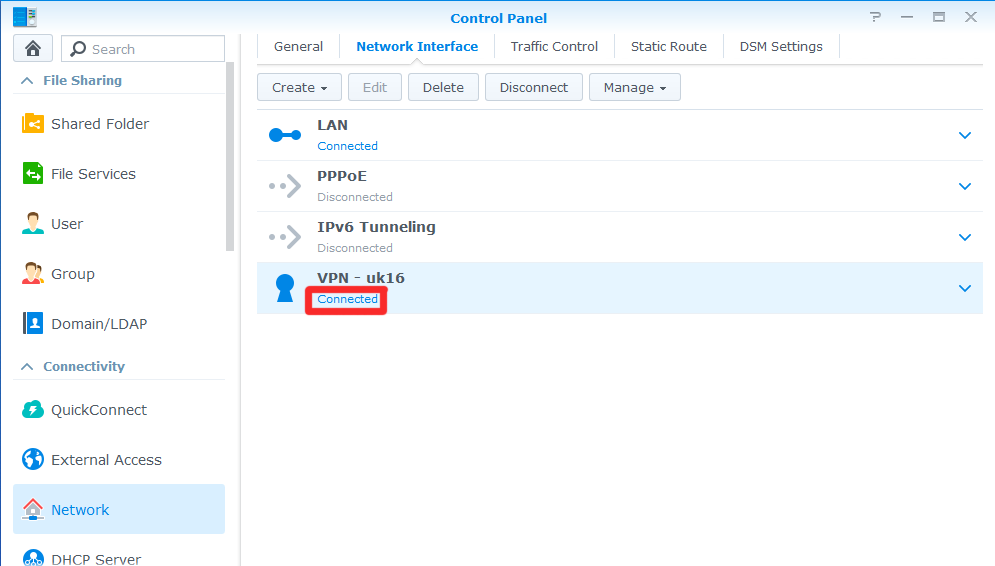
5. Verify that your IP is cloaked
Author: Petr Munzar
Last update: 2017-08-01 12:31
PC - Windows
Identity Cloaker Portable plugin update
You can see a warning about Identity Cloaker Portable Firefox extension since Mozilla Firefox version 40. It says "Identity cloaker Portable Extension couln't not be verified for use in Firefox and has been disabled".

This is already solved in the new Identity Cloaker Portable version. You can get it here.
However, the old extension needs to be updated manually this way:
1, Install the new Identity Cloaker Portable version.
2, Close Firefox and Click on Extension uninstall
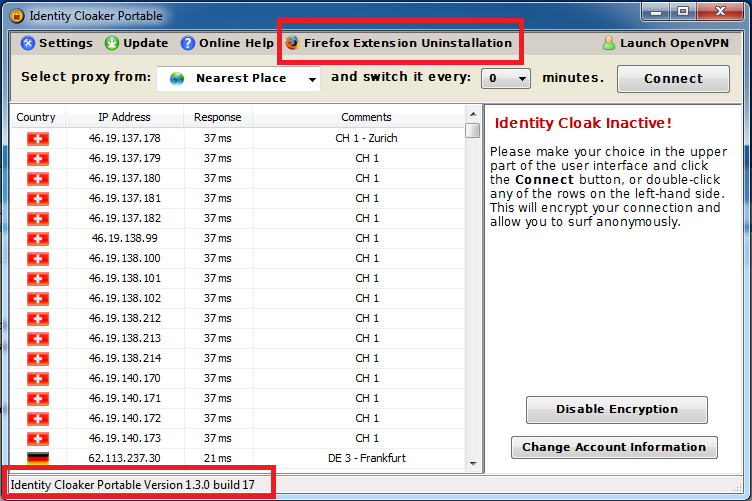
3, Then run Firefox so old extension will get cleared
4, Then please close Firefox again and click on Firefox Extension installation
5, Run Firefox again and confirm installation
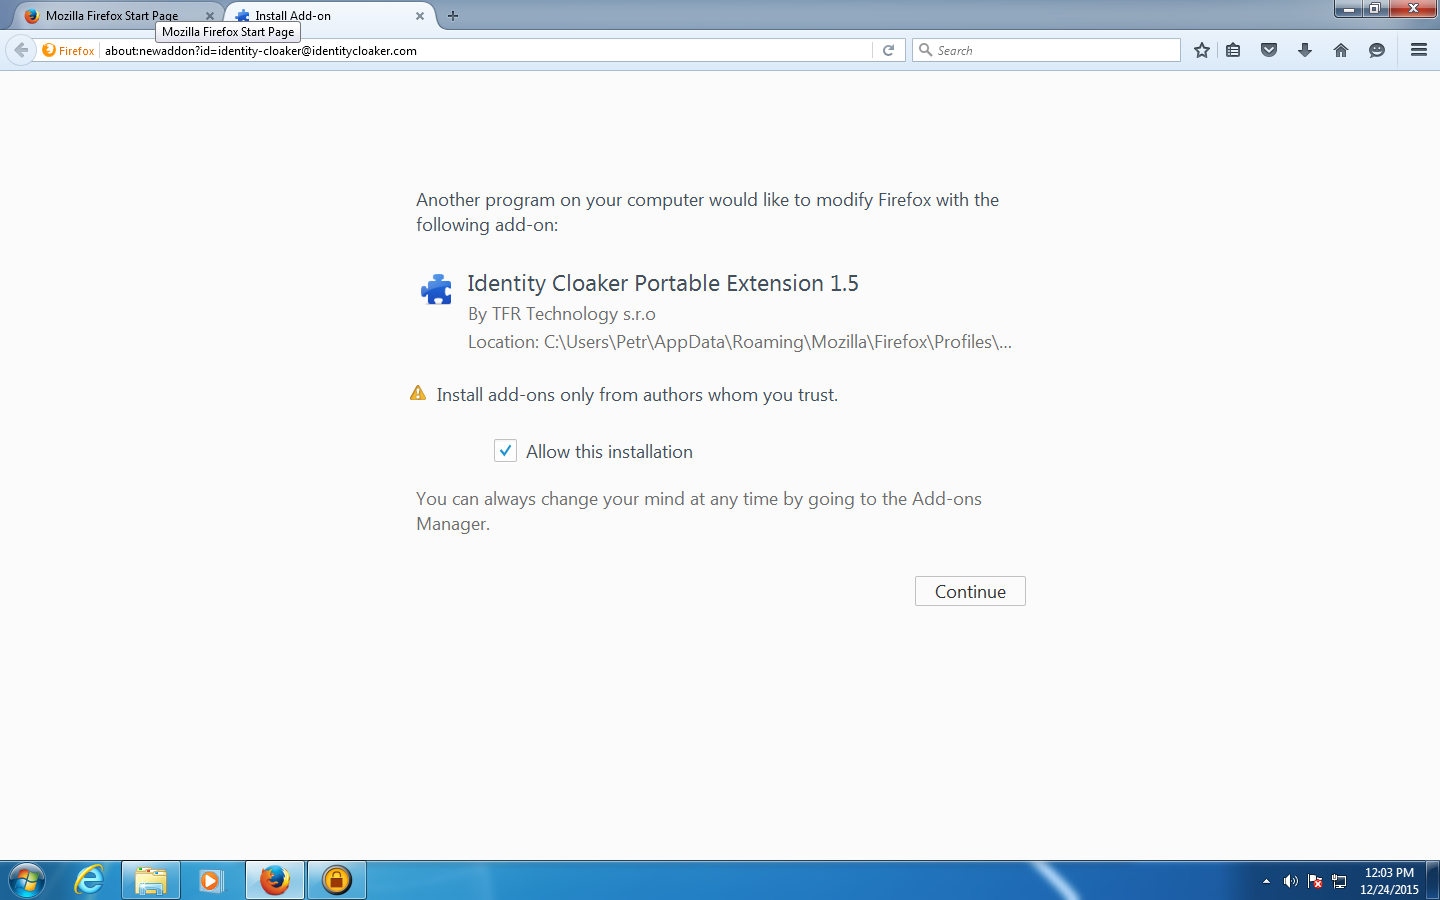
6, Here is the result
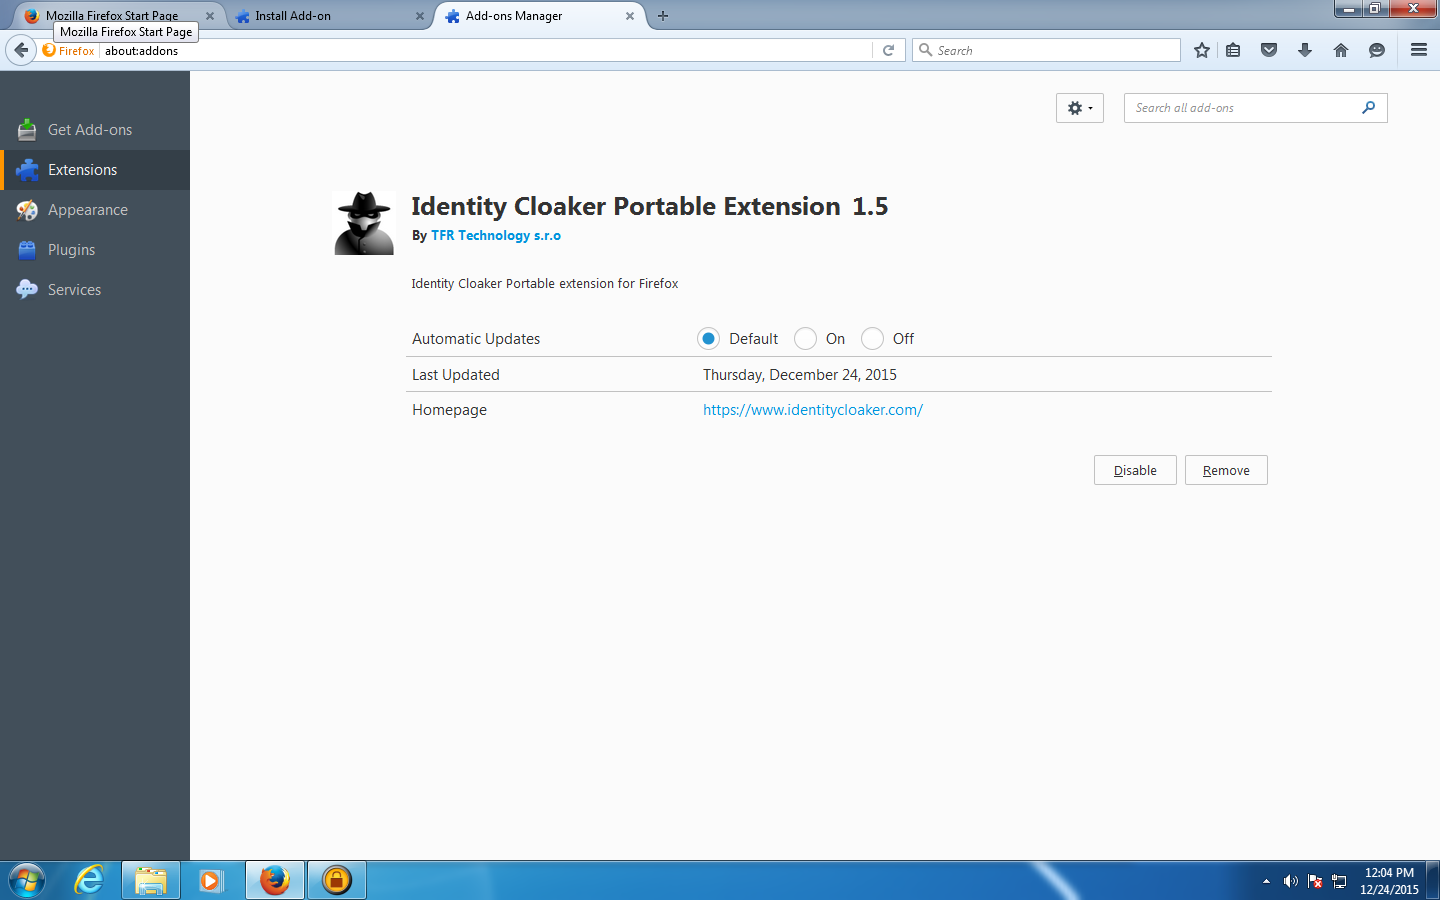
7, You will receive the futures updates through automatic Firefox update feature.
Author: Petr Munzar
Last update: 2017-08-01 12:31
Creating L2TP/IPSec VPN with helper utility
We have developed an utility which will help you to create L2TP/IPSec VPN connections instead of manual configuration.
You can get it from here.
- Identity Cloaker Username / Password: Please use the same credentials as for your Member area and Identity Cloaker application. If you don't remember then you can reset it here
- Verify user online before creating VPN: This will check your user Identity Cloaaker account online so created VPNs will be using the right credentilas. It is possible to disable this option if the application is not able to communicate with our main server (error displayed).
- Check boxes for VPNs you want to create. This connections will apper at Control Panel->Network and Internet->Network and Sharing Center->Change adapter settings
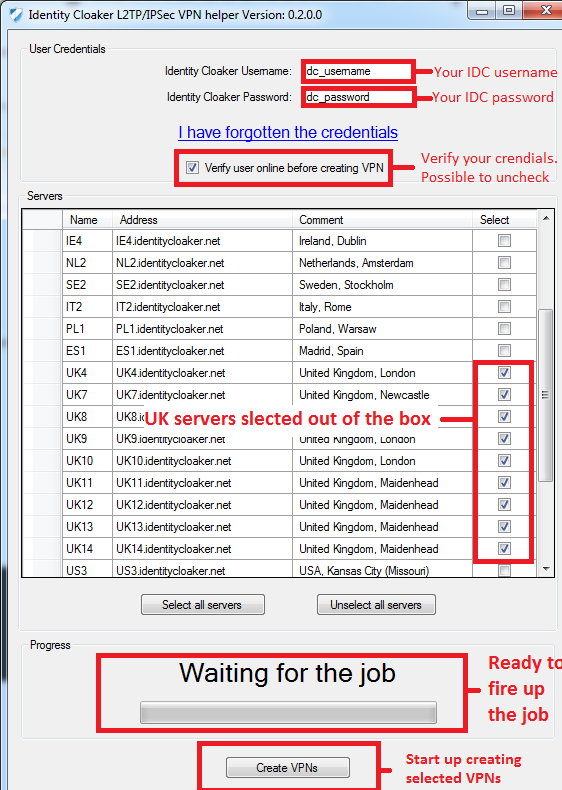
You should see similar box after the job is done.
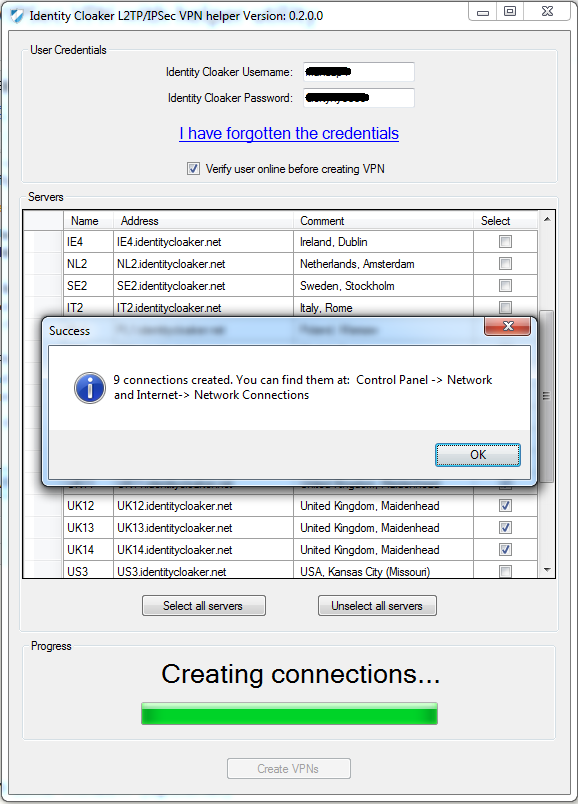
You can now find newly created VPNs at Control Panel->Network and Internet->Network and Sharing Center->Change adapter settings . It is possible to connect with a righ click on the selected VPN.
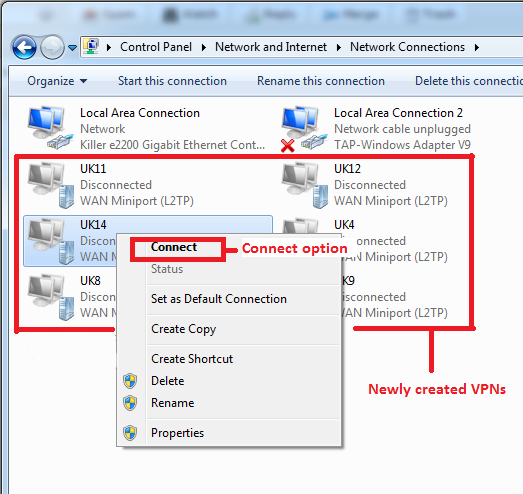
Connecting dialog follows.
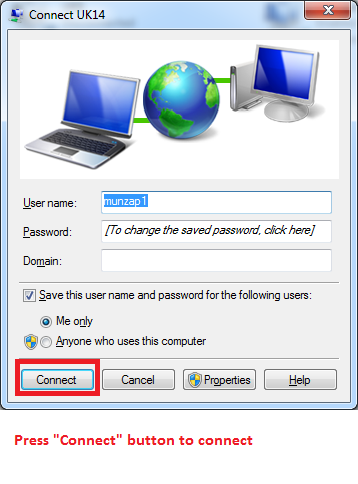
Now the connection attempt will follow.
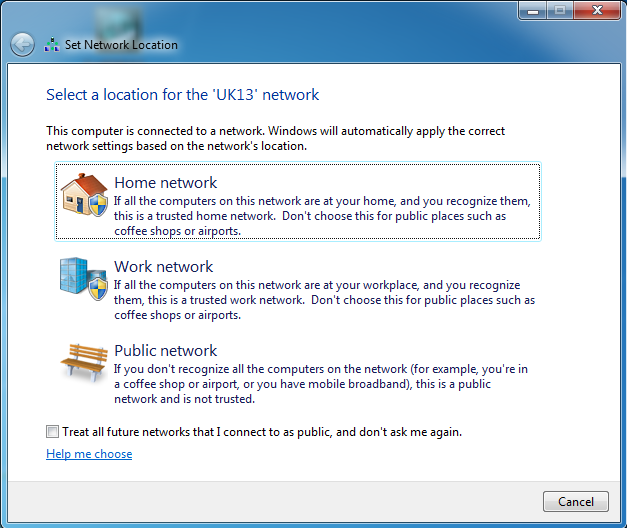
If you see this screen after succeful connection then please click Home Network
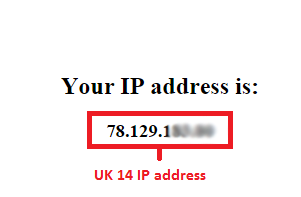
To verify your new IP please check this page. Now the IP should be different to the IP before VPN activation.
You can disconnect his way:
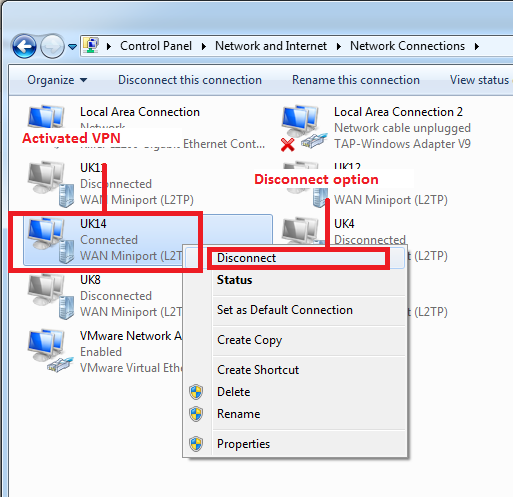
Author: Petr Munzar
Last update: 2017-08-01 12:35
How to share VPN in Windows 7 using Wi-Fi
This tutorial will show you how to create cloaked WiFI network using your PC/Notebook. This can be handy for other devices in your home as Samsung Smart TV, Playstation 3, Apple TV or XBOX.
Requirements:
- System with OS Windows
- WiFi adapter (network card) which can be used to host WiFI network.
- Another dapter with Internet connetion (Ethernet, Cable)
Step 1: Create VPN connection
FIrst please create desired L2TP/IPSec VPN connection. Following this tutorial.
Step 2: Create own cloaked WiFi network
Use WiFi host tab in your VPN helper.
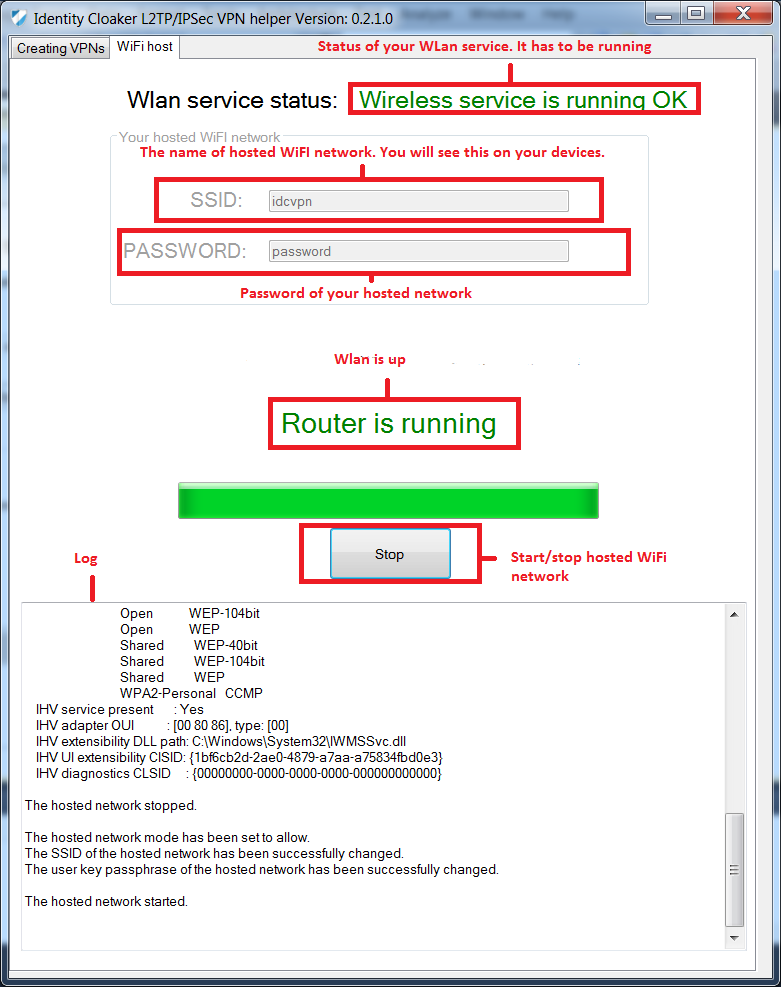
Right Click on VPN you want to share and share it to newly created WiFi host network.

Step 3: Connect on your device
Now you can conect to this new network with your device.
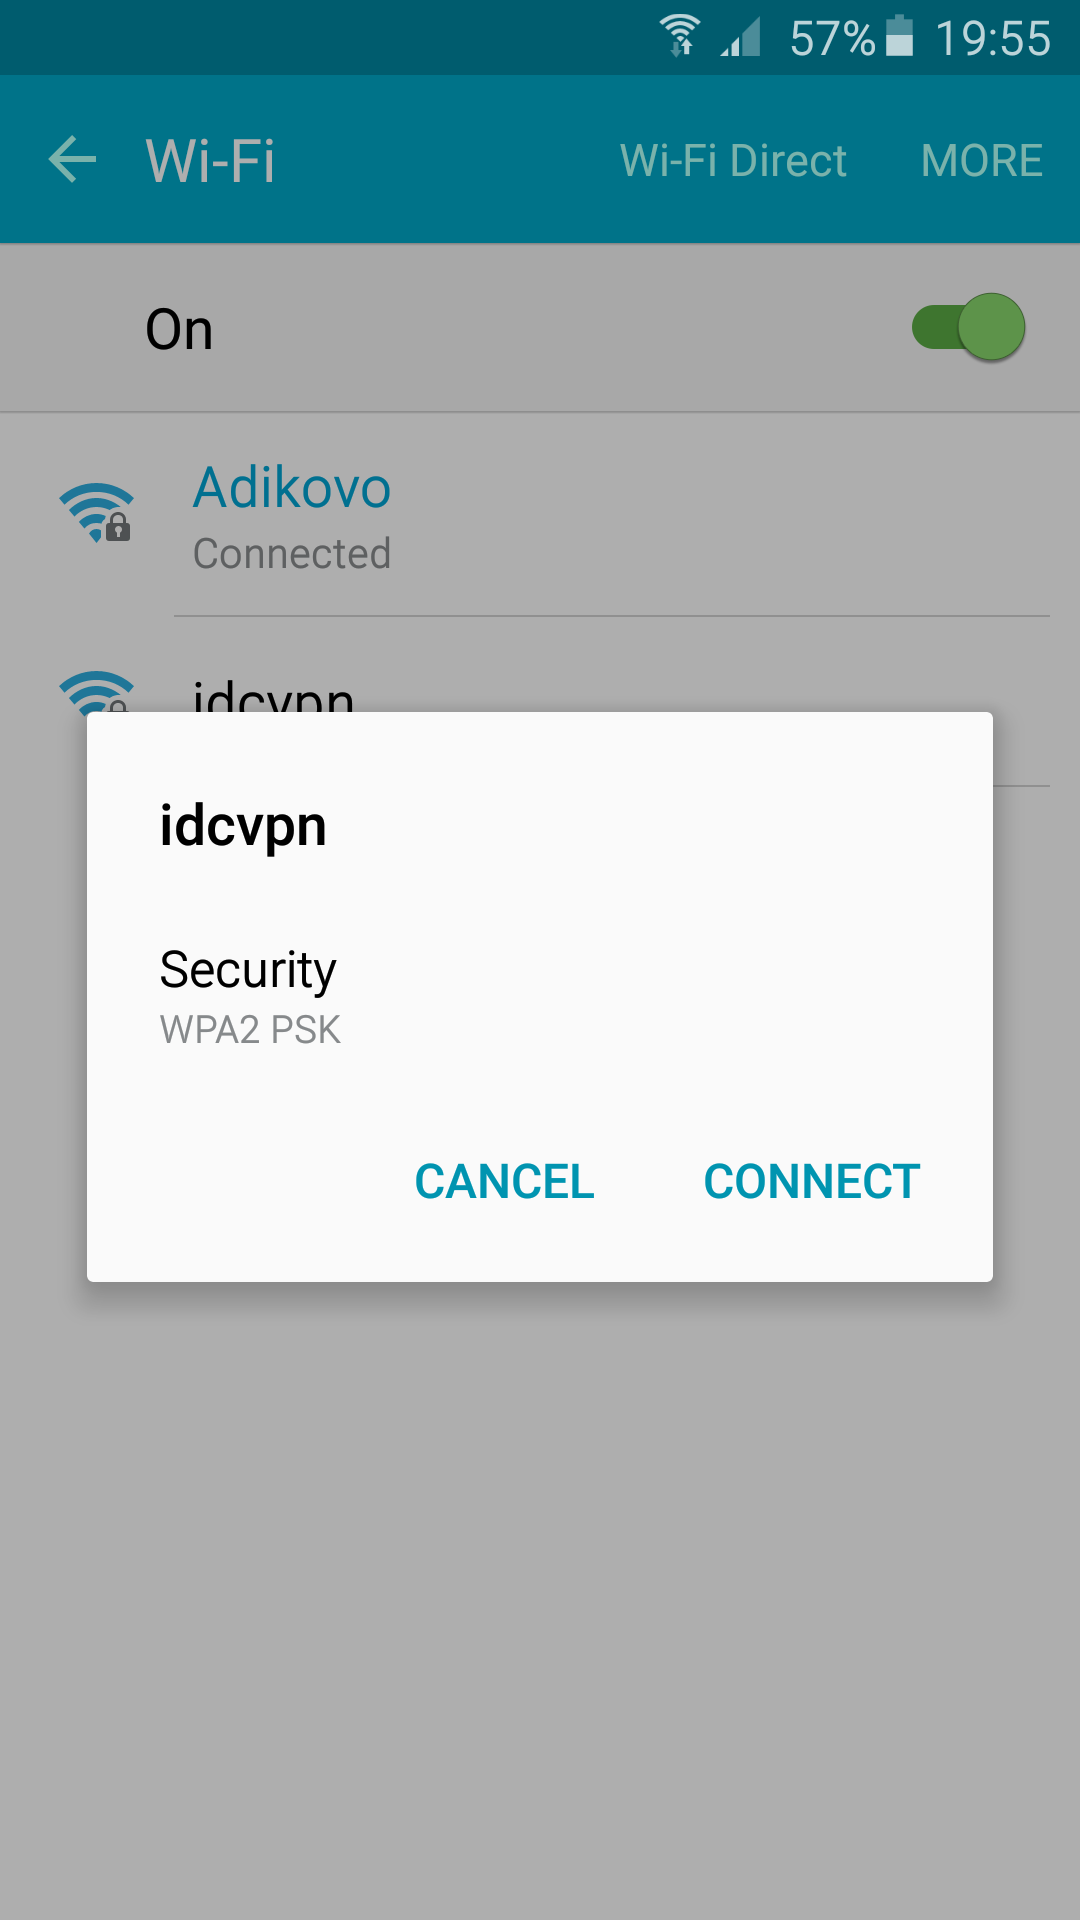
Author: Petr Munzar
Last update: 2017-08-01 12:35
Using Identity Cloaker servers with official OpenVPN release
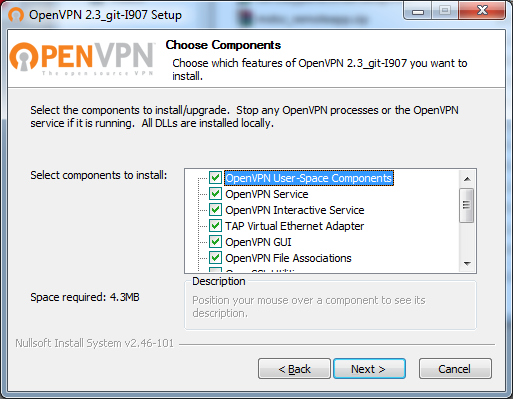
1. Get official OpenVPN realease
You can get official non-portable OpenVPN release here.
For Windows Vista 7,8 and 10 You will be interrested in the package at bottom of the table. Select 64bit or 32bit version according your system (you can select 32bit if you are not sure).
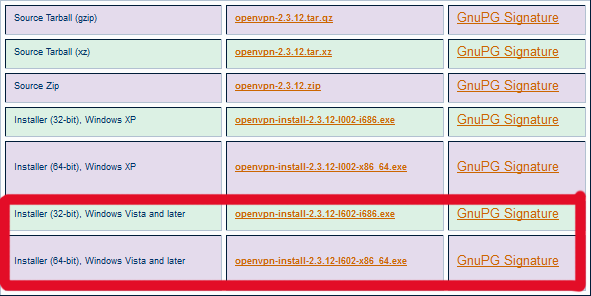
Next step is installing the release.
2. Get Identity Cloaker OpenVPN configs
You can get our current OpenVPN configuration files from here.
Now you can install Identity Cloaker OpenVPN configs. It means simply extracting downloaded zip to the OpenVPN config folder.
Usuall path is C:\Program Files (x86)\OpenVPN\config

3. Connect to our server
Now please run OpenVPN through your desktop icon. And connect to preffered server at your member area.
You will be asked for you login details durring connection attempt. Use your own Identity Cloaker credentials.

Please verify that your credentials are working at your member area and you have a valid subscription before proceeding. Please note that username needs to be used lower case and your password is case-sensitive. You can reset it here.
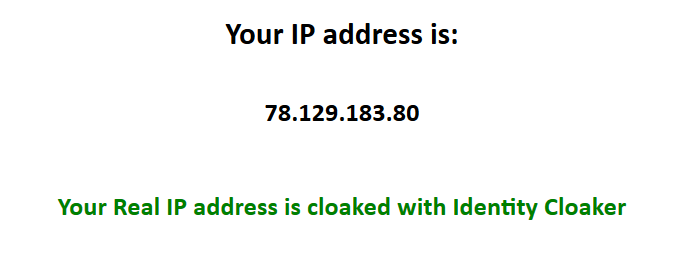
4. Verify that your IP is cloaked
You can verify that OpenVPN is working for you at our IP test page.
Author: Petr Munzar
Last update: 2017-08-01 12:36
Browsers » Maxthon
Enable cloaking of Maxthon browser
Please verify that you have Maxton cloaking enabled in the settings.

Author: Petr Munzar
Last update: 2017-08-01 12:36
Linux
Ubuntu and Mint install script
This install script will help you with installing our OpenVPN package.
Screenshots in this tutorial are taken on Ubuntu but steps are similar also for Linux Mint.
Step 1 - Download and run install script
It's possible use our OpenVPN installation script, which installs OpenVPN and downloads the required configs. You can get it at
http://www.identitycloaker.com/download/linux/ubuntu_20_install.sh
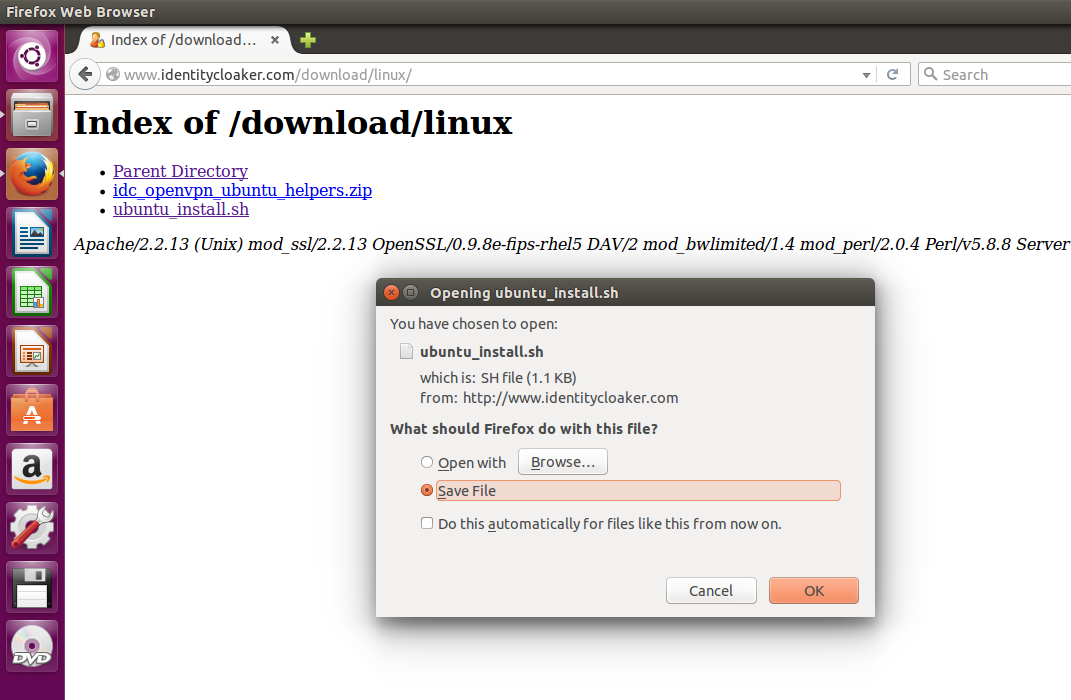
It should be downloaded to your Downloads folder (~/Downloads) with default settings.
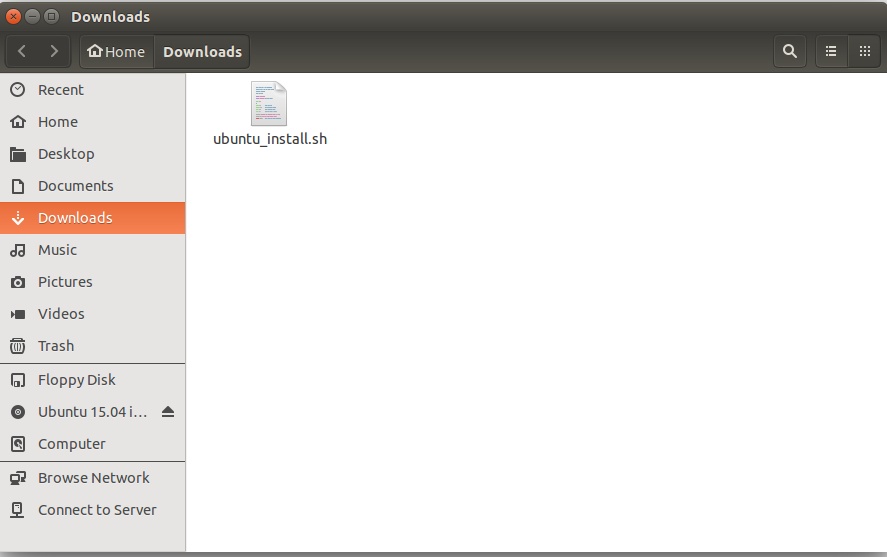
Now run you terminal window.

Navigate with CD (change dir) command to the same directory as ubuntu_install.sh is .The command is usually
cd ~/Downloads
"~" Character is shortcut for your home path (/home/yourusername)
And allow script execution in your terminal with this command:
sudo chmod 777 ubuntu_install.sh
You will be asked for your root (superuser) user password. This is NOT your Identity Cloaker password!

Now you should be able to run the script as root
sudo ./ubuntu_install.sh
You will be prompted for your IDC username.
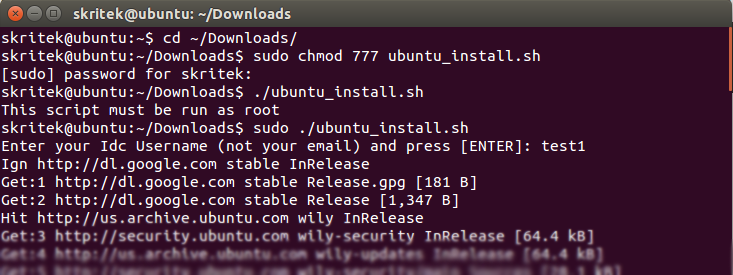
You should be able to select VPN connection in your network-manager after the script finishes.
Step 2 - Connect to a VPN
Do a right mouse click on the up-down arrows in the case of ethernet connection or on Wi-Fi icon in the upper-right desktop corner.
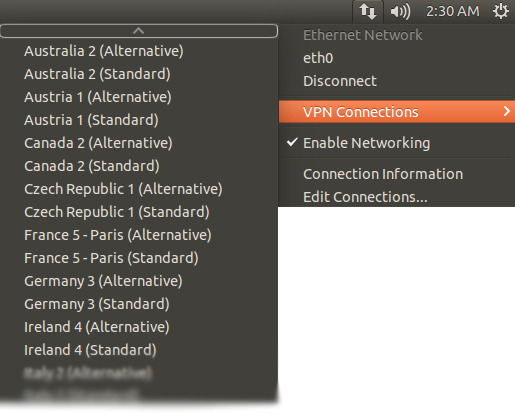
Please insert your Identity cloaker password (tied with username inserted in the script) password.

Then VPN should be connect.

Step 3 - Verify results
Verify that your IP is cloaked at https://www.identitycloaker.com/iptest.php

You can disconnect in the tray menu when you don't want to be cloaked.
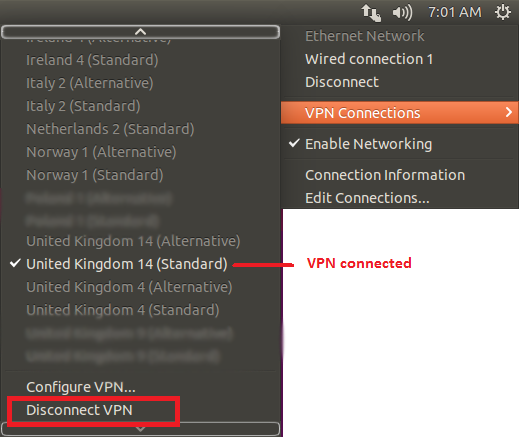
Note 1:
If you can see the error message "The VPN connection to "xxxVPNxxx" failed because there were no valid VPN secrets". Then please try to edit the connection and insert your password manually.
Note 2:
If you you are experiencing a gnome network manger bug and no connection attempt is made after selecting menu item. Then you can control the connection manually.
To list all NM connections: nmcli con
start VPN connection : nmcli con up id ConnectionName
for example: nmcli con up id "United Kingdom 16 (Standard).ovpn"
down connection: nmcli con down id ConnectionName
Author: Petr Munzar
Last update: 2020-12-22 20:50
Ubuntu 14.04 LTS+ a and Mint 17.3+ Cinnamon OpenVPN config manual import
This tutorial shows you how to import selected config files from our OpenVPN package manualy. It was tested on Ubuntu and Mint distributions but it should work also on other Linux distributions based on Gnome desktop and with network manager installed.
Step 1 - Download our OpenVPN configs
You can get current OpenVPN configs here. Please donwload the .zip package and extract it.
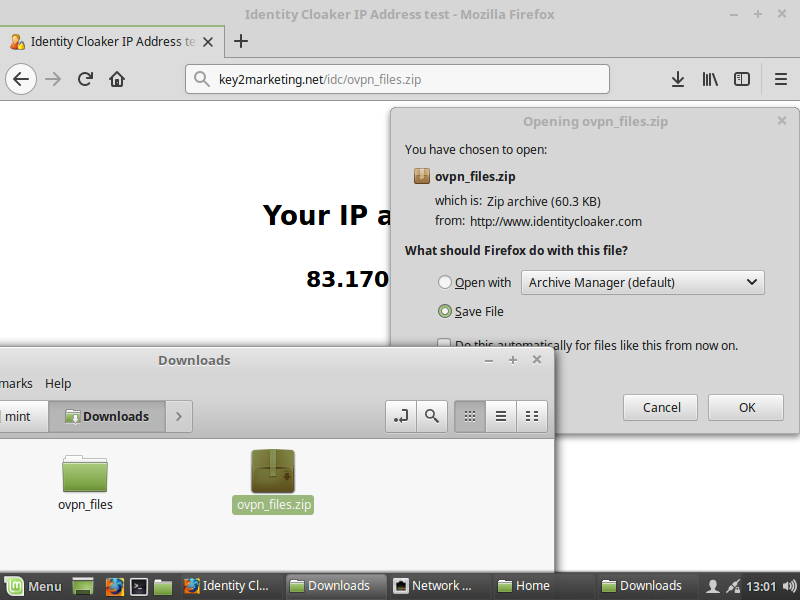
Step 2 - Run network manager and import OpenVPN configs
Now you can run the etwork manager from tray area (right bottom corner) and import OpenVPN config (left click).
Note: If you have trouble finding network manager then you may need installing the GUI with these commands.
sudo apt-get install network-manager-openvpn
sudo apt-get install network-manager-openvpn-gnome
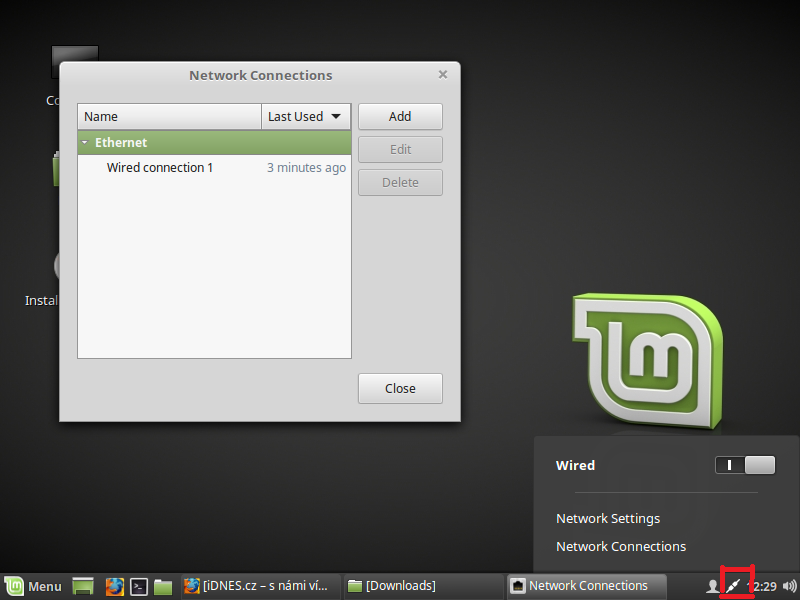
Click Add button and select the option "Import a saved VPN configuration..."
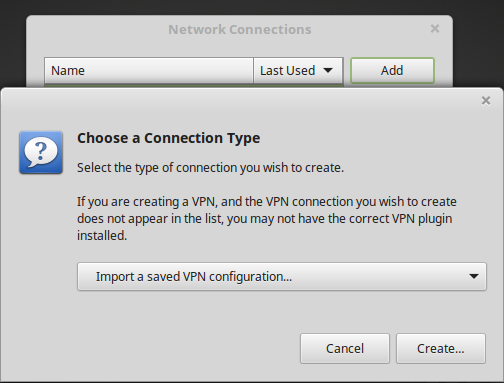
Now click Create button. You will be able to select prefered OpenVPN config from downloaded package.
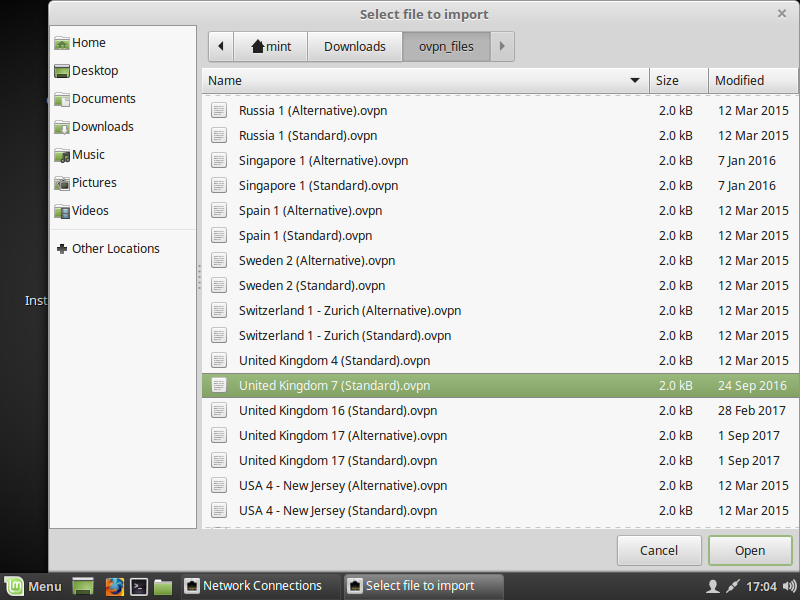
Click Open button.
Then you should be able to fill in your IDC credentials. Please check your IDC Welcome mail if you don't remeber it.
Note: Username is NOT your whole email address. And it need to be typed in lower-case form.
Note 2: In older Mint versions you may need to select Authentication type to password manually and also find CA Certificate (ca.crt) in our package - keys folder.
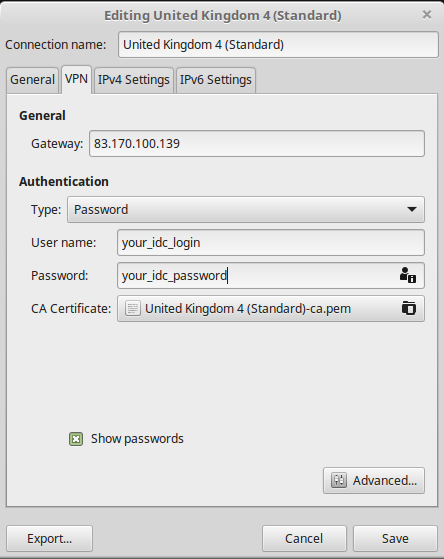
Click Save button.
Note: You may be asked for new keyering password. Keyering will help you with storing your VPN passwords. You can pick any password you want. But you need to remeber it for future usage. Although it is possible to reset the storrage (but all stored passwords will be forgotten).
Step 3 - Connect to created VPN
Now you should be able to connect to the OpenVPN. Just select the new item from tray area menu (left click)

Step 4 - Verify results

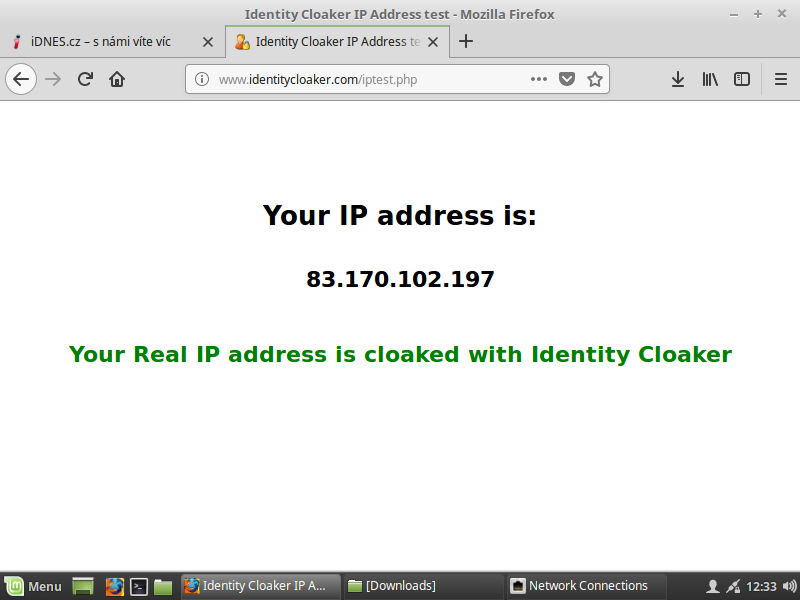
Author: Petr Munzar
Last update: 2018-01-29 08:10
Linux OpenVPN in bash
It is possible to use OpenVPN from bash (terminal) on most of Linux distributions.
Step 1 - Download our OpenVPN configs
You can get current OpenVPN configs here. Please donwload the .zip package and extract it.
You can aslo use terminal commands:
wget https://key2marketing.net/idc/ovpn_files.zip
unzip file.zip -d idc_configs ( You may need to install unzip if not available)

Step 2 - Use OpenVPN
cd idc_configs
sudo apt-get install openvpn (example for Ubuntu)
sudo openvpn "United Kingdom 7 (Standard).ovpn" (You can use any other config from the folder).
You should see log ending with message:
Initialization Sequence Completed
Step 3 - Verify results

Step 4 - Disconnect
You can disconnect by killing OpenVPN process with CTRL + C shortcut to the terminal window.
Author: Petr Munzar
Last update: 2018-01-28 21:57
Mac OSX
Native L2TP/IPSec VPN for Mac OSX
To use Identity Cloaker service through Mac OSX native L2TP/IPSec VPN please follow this tutorial.
Choose Apple menu ( ) > System Preferences, and click Network.
Select your VPN service in the list.
If there is no VPN connection listed, then click  over the lock icon, and in the menu "Interface" pick VPN, and VPN type L2TP/IPSec, click "Create".
Add server address: uk12.identitycloaker.net
(for UK12 server, without "http://" and "/" after)
Account name is your Identity Cloaker username (all in lowercase), click "Apply".
(The screenshot displays my username "jasek99" but you have to enter your own)
.jpg)
Go to "Advanced/Options", and check "Send all traffic over VPN connection", click OK/Apply.
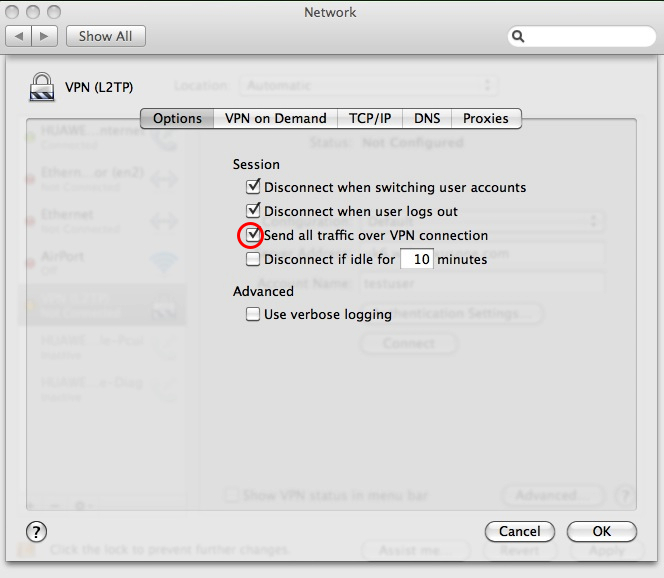
Go to "Authentication Settings", enter your Identity Cloaker password (case sensitive) and shared key/secret: idcvpn4876 (please, enter in lowercase), without certificates; click OK/Apply.
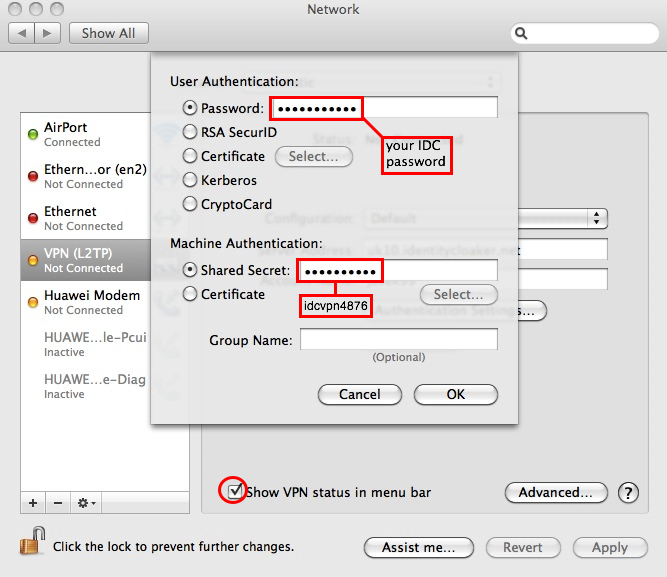
Click "Connect".
You may check "Show VPN status in menu bar", and use the menu bar icon as shortcut.
Available IPs:
AU2, CA2, CH1, CZ1, DE2, FR5, IE4, NL2, SE2, IT2, PL1, ES1, UK4, UK7, UK8, UK9, UK10, UK11, UK12, UK13, UK14, US3, US4, US5, US6, US7, RU1, NO1, PT1, AT1
Updated version of our servers list can be found at your member area.
To access them, replace the "uk12" part in uk12.identitycloaker.net with any of these.
If you have checked the option "Show VPN status in menu bar". Then you can disconnect through tray icon in the right top of desktop.
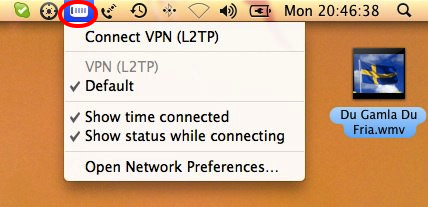
Author: Petr Munzar
Last update: 2017-08-01 12:36
Tunnelblick installation
If you want to use Tunnelblick application (MacOSX version of famous OpenVPN software). Then please follow these instructions.
Steps required:
Get the current version here.
Current TBLK (OVPN) configs are here. Please save it on your Mac.
Now please open Tunnelblick.dmg image and double-click Tunnelblick icon for installation.
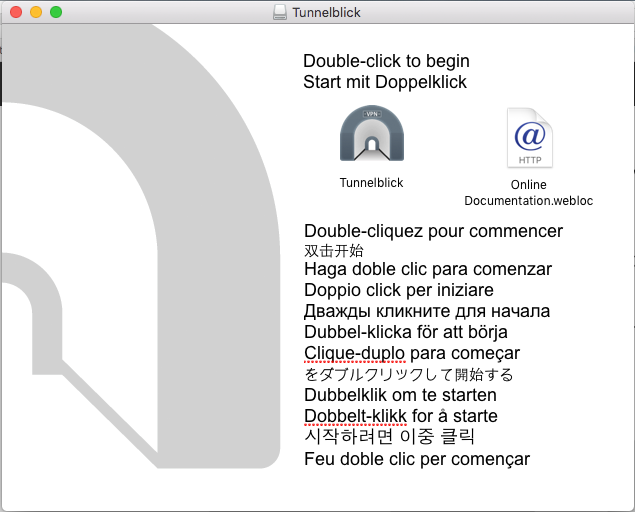
You may be asked for your OSX Administrator password.
After installation you should see following dialog. Please click Quit button.
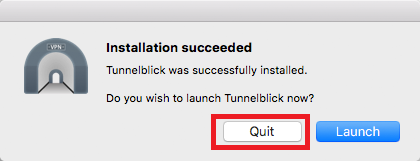
Now you can install TBLK configs. This will work only if Tunnelblick is not running!
Double-click desired config from downloaded package.
You can install it for all users or just for your OSX user account.
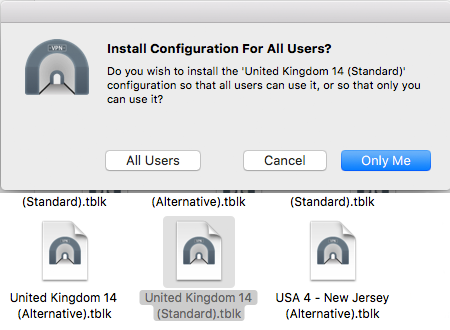
Now you should be able to connect through Tunnelblick icon in the top right tray menu.
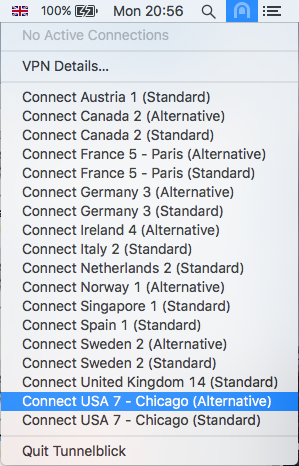
You will be asked for your Identity Cloaker login detals (please see your Welcome mail).
Please note that Identity Cloaker username needs to be entered in lowercase. And it is not your email address. Identity Cloaker password is case sensitive.
I suggest checking Save in keychain checkbox.

Connection should be estabilished after clicking OK button.
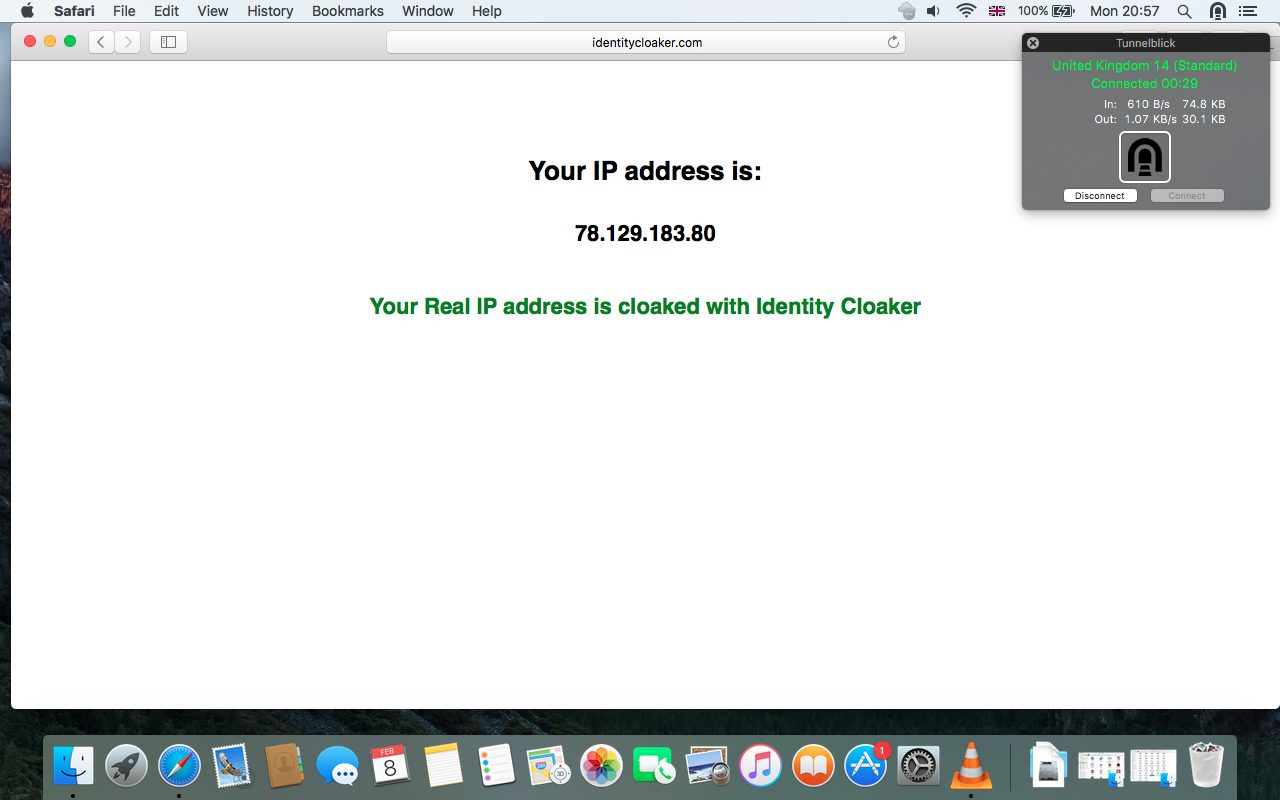
You can disconnect at the same tray menu where the connection was estabilished.
Author: Petr Munzar
Last update: 2018-04-30 20:19
Getting IDC Daemon log
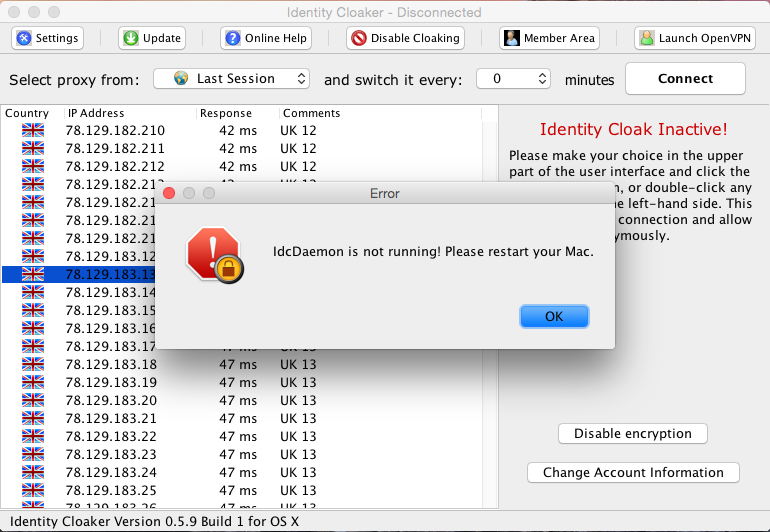
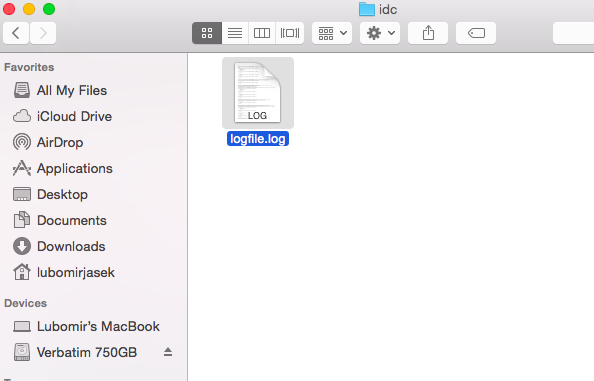
If you are experiecning issues with starting IDC daemon then please send us a log from /var/log/idc/logfile.log
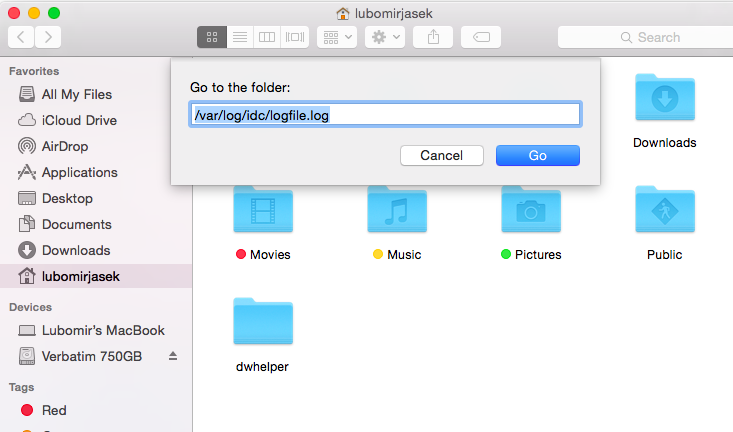
To find the log file, you can open Finder, press ⇧+⌘+G, enter /var/log/idc/logfile.log and click Go or press Enter.
Author: Petr Munzar
Last update: 2017-08-01 12:35
OSX VPN sharing
If you need to share your cloaked connection from your OSX laptop then you can use native OSX feature.
If you want to share IDC VPN via Wi-FI then connect your Max OS to your router via Ethernet, but if you want to share you VPN connection via Ethernet (use twisted UTP cable) then you have to connect your Mac OS via Wi-FI .
So you need to create a VPN connection. More info here.
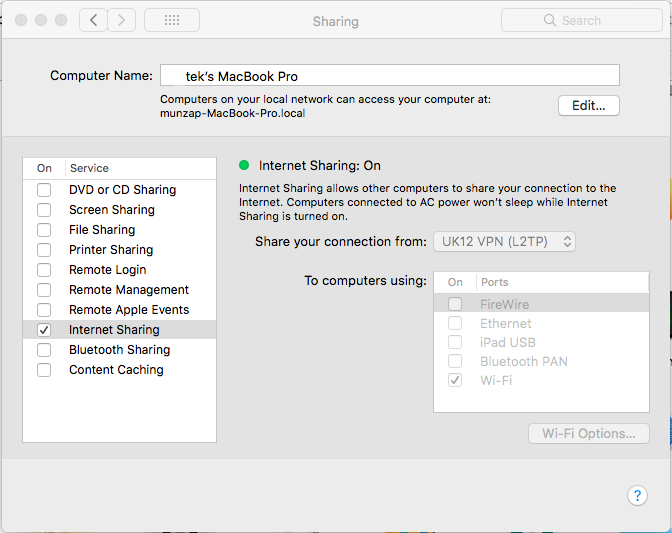
And you can share it at "System Preferences->Sharing"
Click on Internet Sharing option and select your L2TP VPN as "Share your connection from" to WiFi or ethernet. Now you can enable the "Internet Sharing" checkbox and confirm the alert.
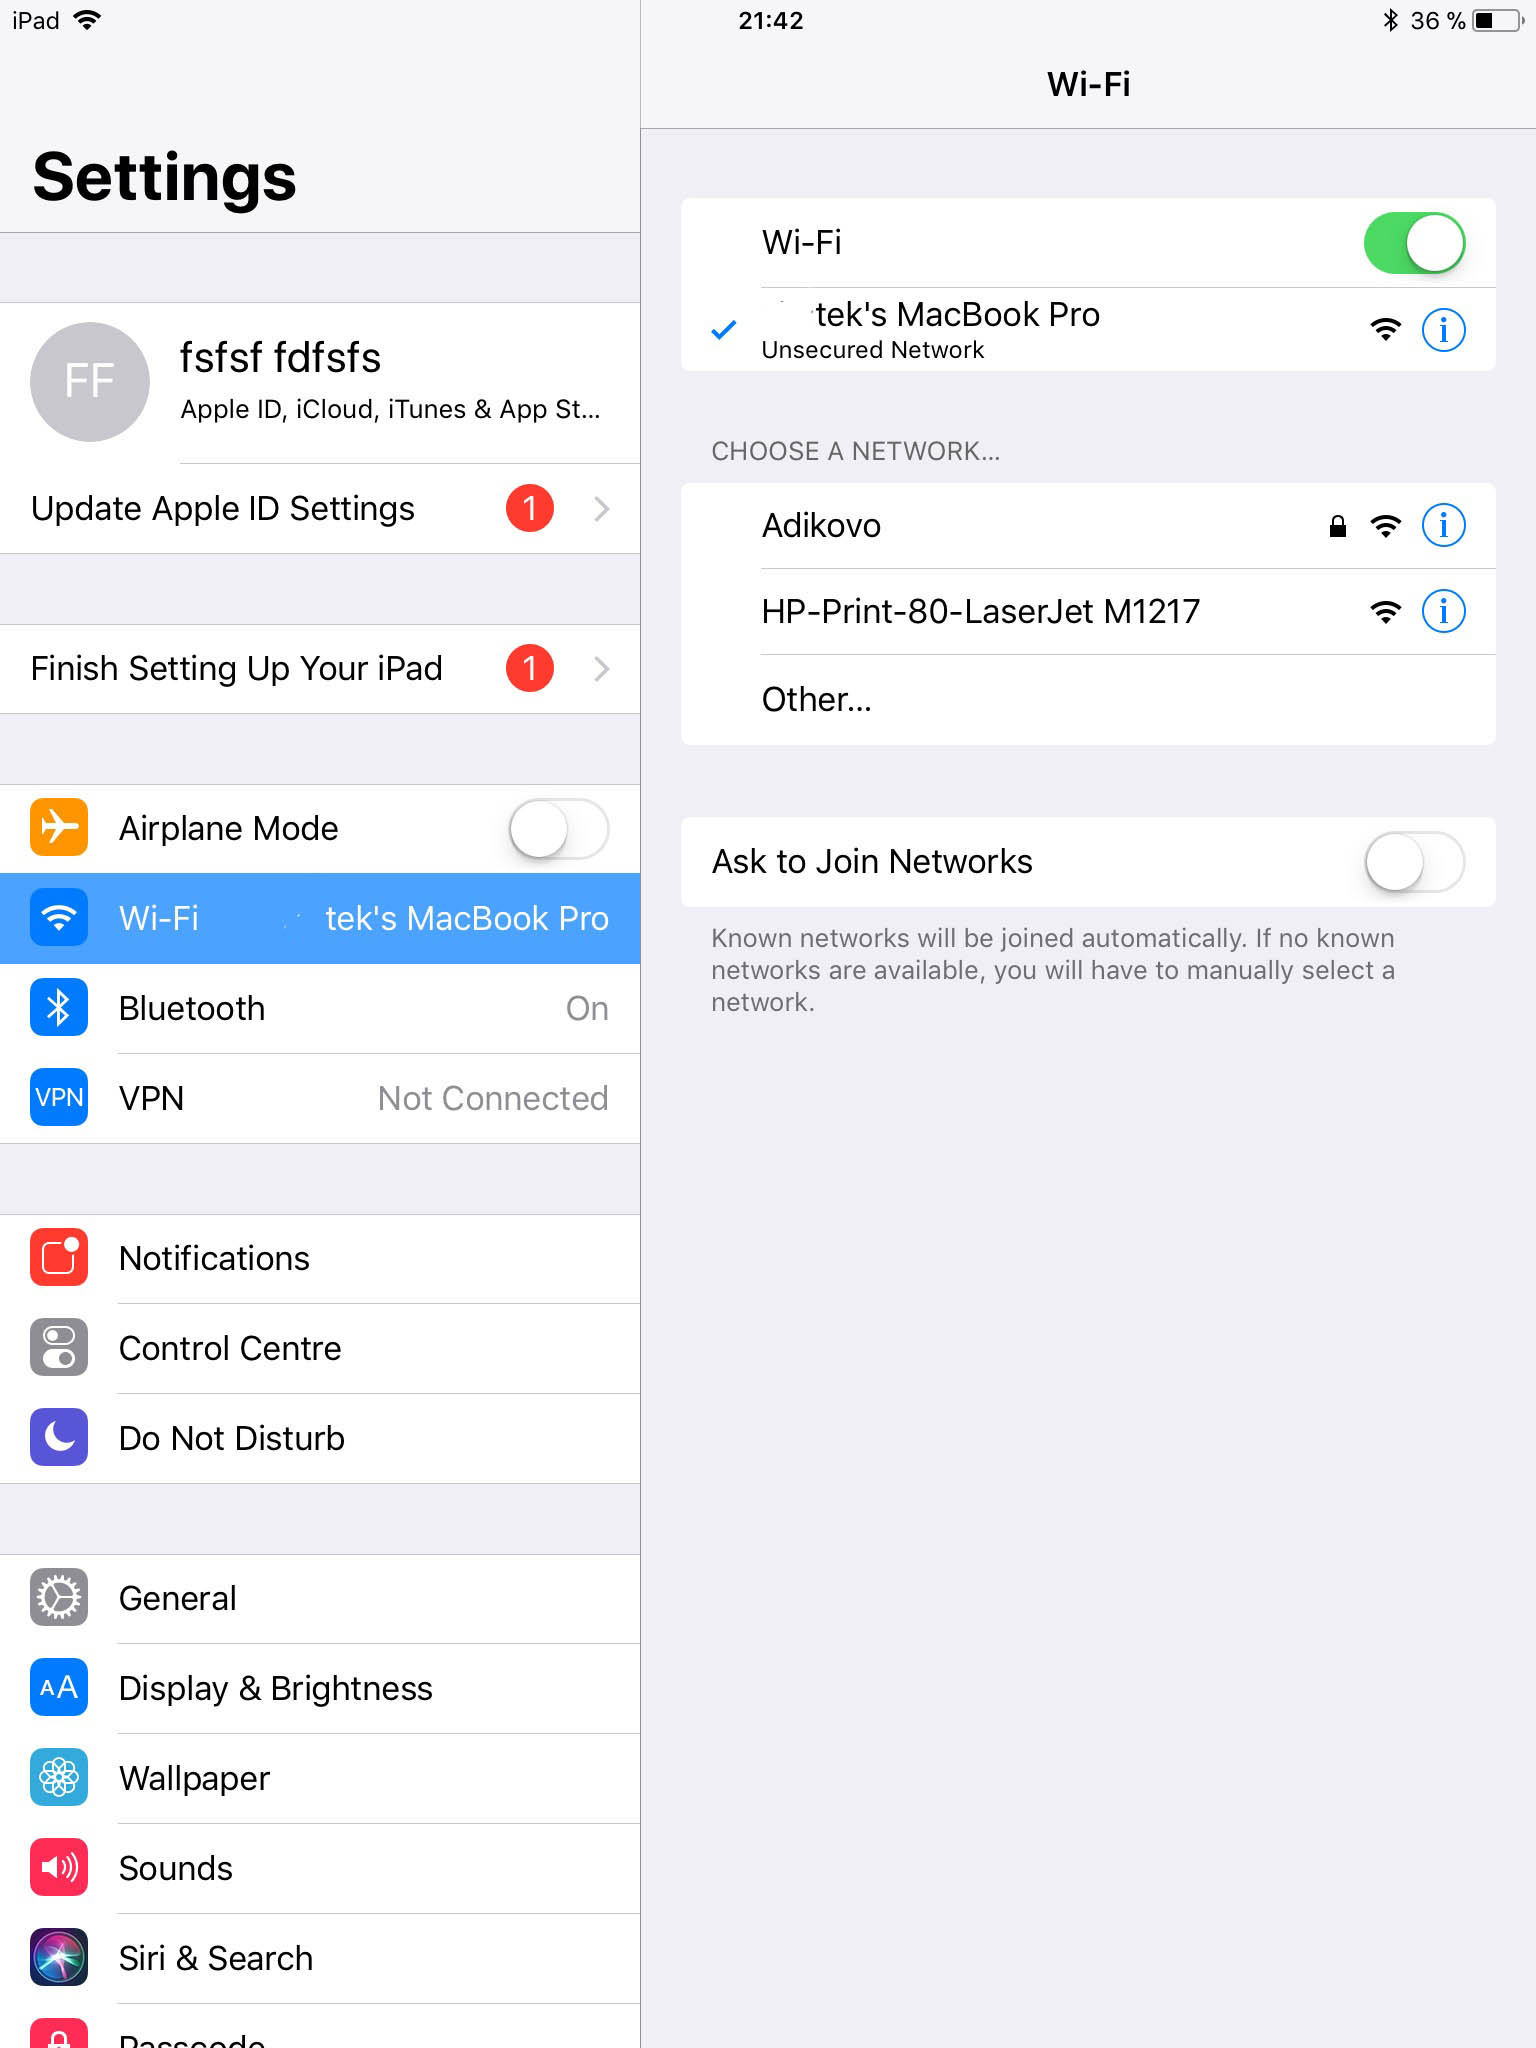
And then use UTP cable or Wifi to interconnect MAC and other devices.
Author: Petr Munzar
Last update: 2020-11-26 12:51
Routers
DD-WRT
a) Installing DD-WRT
DD-WRT is an alternative Linux based firmware for many today routers. It has many useful functions including OpenVPN client.
Well supported routers are for example ASUS RT-N66U, ASUS RT-N16, ASUS RT-N18U, TP-LINK TL-WR842ND and others. You can see the full list here. You should look for routers with at least 8MB of Flash memory as you need to use Big or Mega version of DD-WRT to get OpenVPN client running.
You can see compare DD-WRT firmware versions here.
The latest Firware (beta) can be found at their FTP. All versions are not always available via web.
Please read the instructions for flashing carefully as improper installation can brick you router.
I have used factory-to-ddwrt.bin on my TP-LINK TL-WR842ND as this image is the first DD-WRT installation.
So we are up and running.

b) Using DD-WRT OpenVPN Client
Please follow these instructions for using Identity Cloaker OpenVPN:
1) Click the "VPN" tab in the "Services" section, or just scroll down the "Services" page if you are using an old version of DD-WRT.
2) Enable the OpenVPN Client.
3) Set the Server IP/name to SERVER_NAME.identitycloaker.net * (Server Names described below the tutorial)
4) Set "Port" to 443.
5) Set "Tunnel Device" to TUN.
6) Set "Tunnel Protocol" to UDP.
7) Set "Encryption Cipher" to AES-256
8) Set "Hash Algorithm" to SHA1
9) Set the option "User Pass Authentication" to Enabled
10) Fill up your Identity Cloaker username and password (please see your Welcome mail).
Please note that Identity Cloaker username needs to be entered in lowercase. And it is not your email address. Identity Cloaker password is case sensitive.
11) Enable "Advanced Options"
12) Set TLS Cipher to "None"
13) Enable "LZO Compression" (Yes option)
14) Enable "NAT"
15) Disable Firewall protection option
16) Set Tunnel UDP Fragment to 1450.
17) Enable the option Tunnel UDP Fragment
18) Keep "nsCertType" unchecked
19) In the "Additional Config" copy and paste the following:
persist-key
persist-tun
tls-client
19) Copy and paste the contents of "ca.crt" into the CA cert field.
You can get it from this package (keys folder)

20) Click the "Apply settings" button and check VPN status at Status menu -> OpenVPN . You should see Connected notice there.

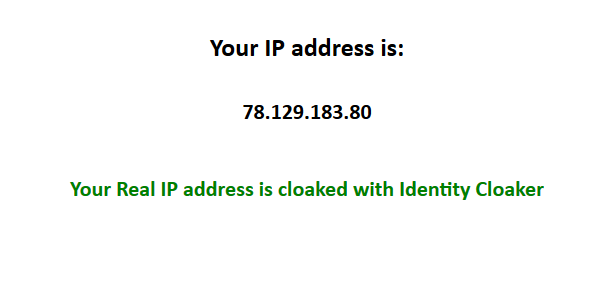
You can test your IP address here.
*Available servers (enter instead of the SERVER_NAME in step 5):
AU2, AT1, CA2 , CZ1, FR5, DE3, IE4, IT2, NL2, NO1, PL1, PT1, RU1, SG1, SP1, SE2, CH1, UK4, UK9, UK12, UK13, UK14, US4, US7
Updated version of our servers list can be found at your member area.
Author: Petr Munzar
Last update: 2017-08-01 12:33
Asus routers
It is possible to use our OpenVPN configs on Asus routers with OpenVPN support.
1. Downloading configs
You can get configs here. Please click on "Save link as" if you have troubles with download. Then extract downloaded zip to any folder on your PC.
2. Get into your router Admin interface
Please open your browser and get into your router admin web interface. It is usually on the IP address http:\\192.168.1.1 or http:\\192.168.0.1 with username/password admin/admin. Default values can be also found on a sticker on the bottom of your router.
In Admin menu Select VPN->VPN Client and Click on the button "Add profile".

3. Configure your VPN
Please verify that your credentials are working at your member area and you have a valid subscription before proceeding.
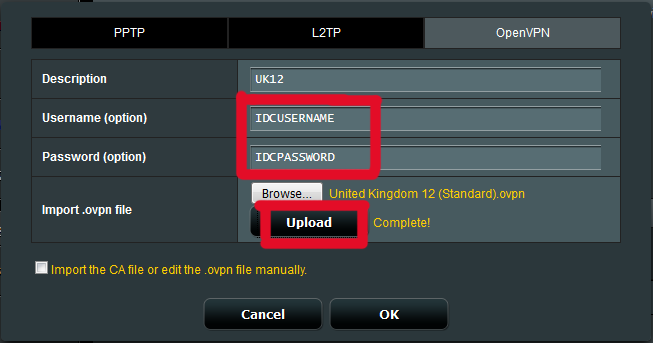
Now please select OpenVPN tab and fill description for VPN and use your own IDC Credential for username/password fields. Please remember that username needs to be used lower case and your password is case-sensitive.
Then you can upload .ovpn config from downloaded package by click on "Upload" button and confirm with OK.
4. Activate your VPN
You should be now able to activate the VPN with Activate button.

5. Verify that your IP is cloaked
You can now verify that the activated VPN is working.

IP test page

Author: Petr Munzar
Last update: 2017-08-01 12:36


.jpg)


